Category: Research

  • Additional Panel Setup Research

    Additional Panel Setup Research

    While I’m waiting for this lockdown to conclude, I’m really just continuing my research. I wanted to discuss the build with my local EAA chapter here in Oklahoma City before I made the purchase of the empennage kit which would need to include tools as well. I’m hoping they will have some good insight, tips to share, and recommendations. So, in my continued research, I am most interested in the panel setup and the avionics, which is something I’ll be using quite a bit of during flight both in VFR and IFR conditions.

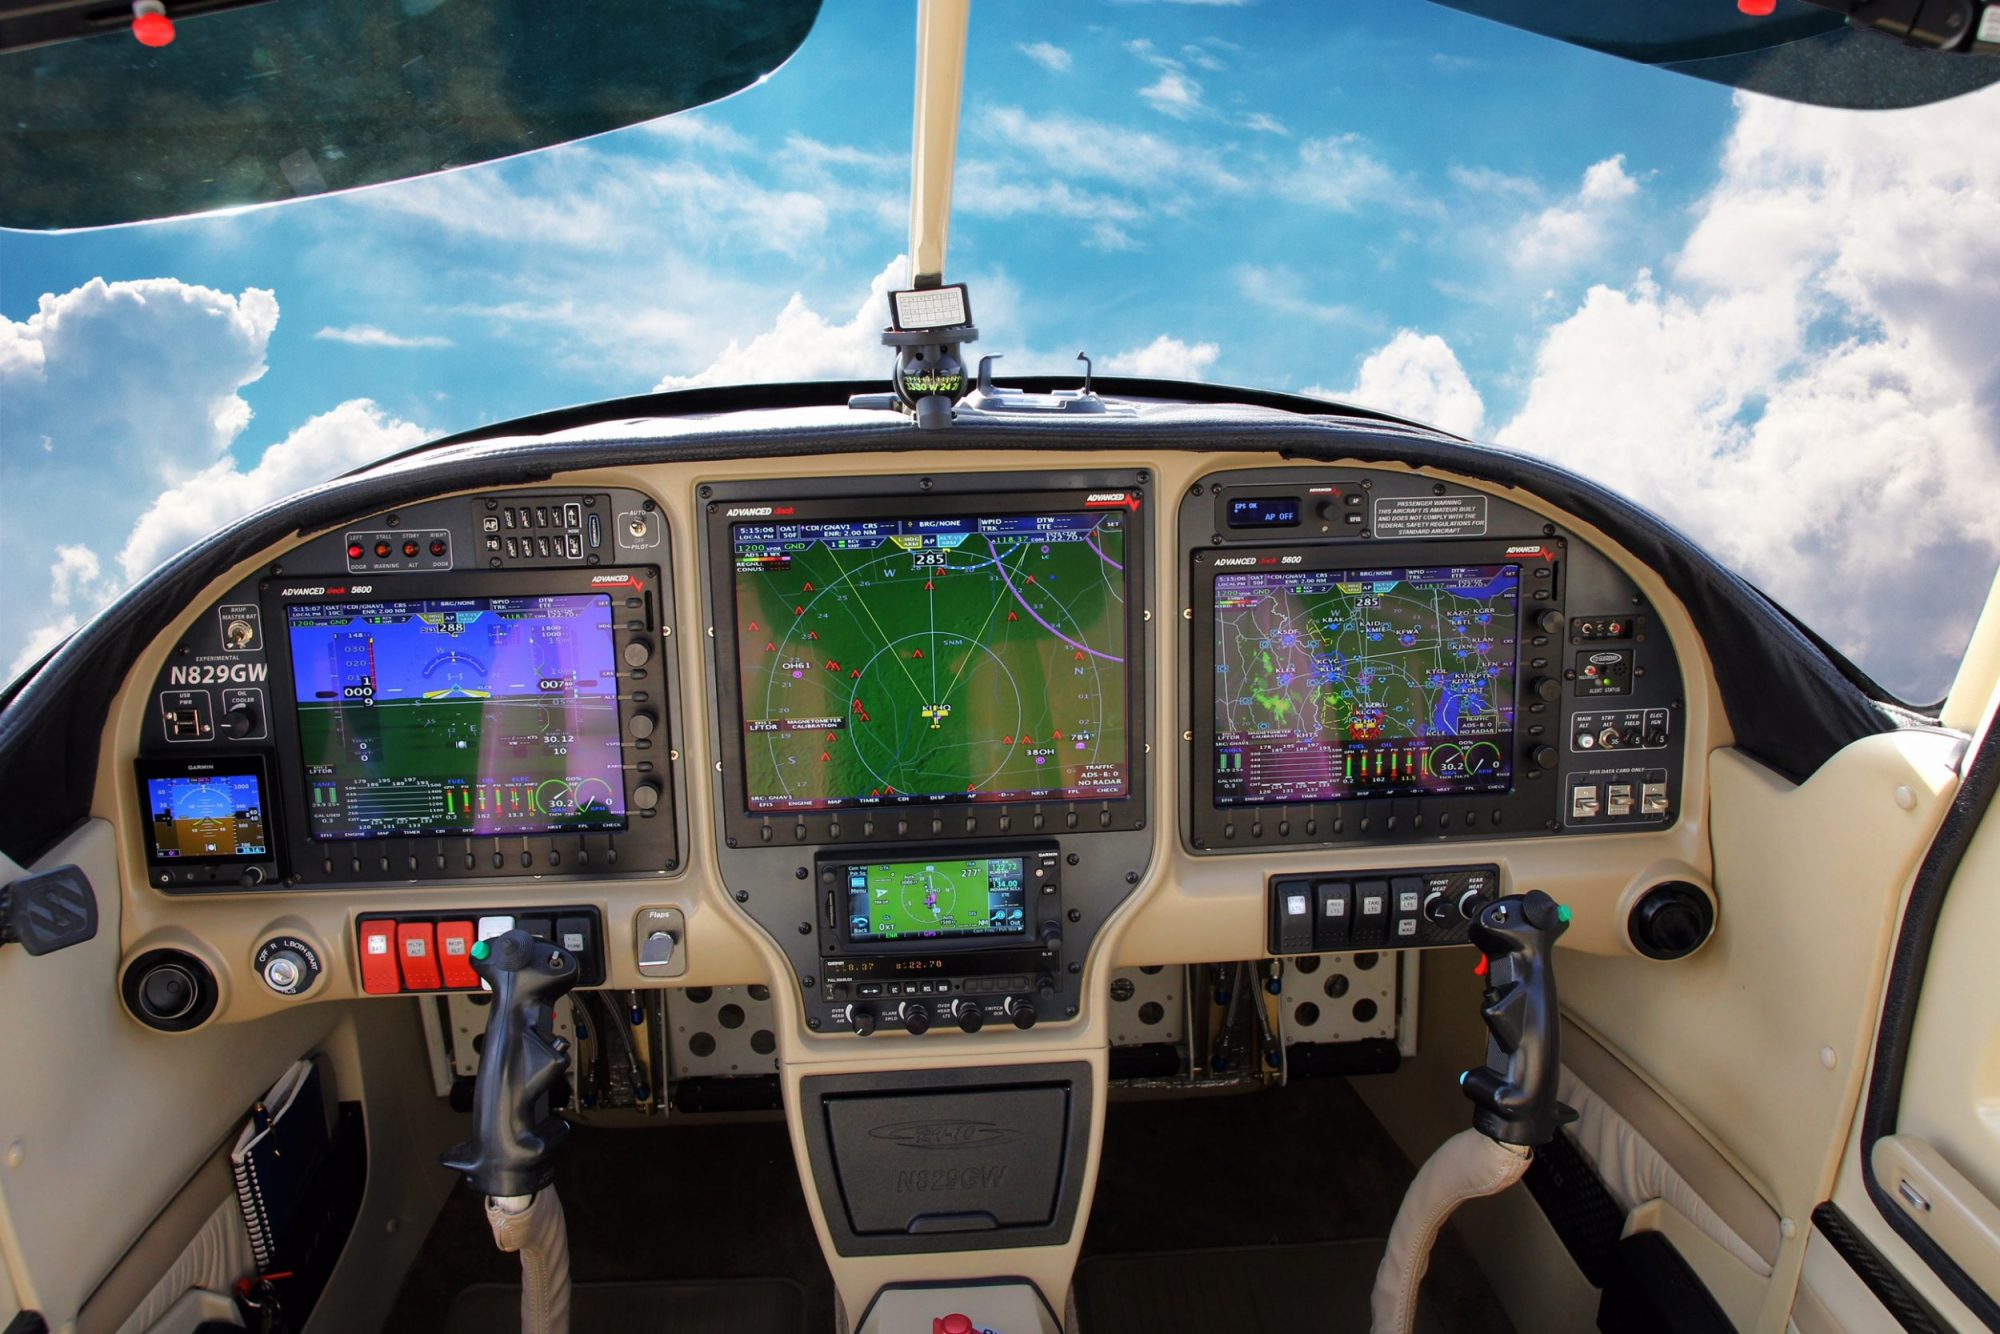
    I don’t want to call any companies and get them riled up or waste their time on how to set up my panel, but the Garmin setup looks very fascinating! They have so many backend modules that integrate with the G3X and it reminds me very much of the days of my private pilot training using the G1000. I’m very impressed by the Garmin G3X Autopilot system. According to the literature I’ve read, the additional components you would buy are the smart servos for either the roll, roll/pitch, and roll/pitch/yaw configuration you desire and it will integrate with the system. You then access all of the controls through that panel.

    I’m also interested in the ESP (not telepathy, lol but it stands for Electronic Stability and Protection. It allows the system to protect you from going beyond your airplanes operating envelope. Their video explains it better than I can, but it works in both the roll and pitch categories to keep you from over banking or stalling/overspeeding the aircraft.

    Garmin ESP Overview

    I will say I’m torn about weather to get a GTN650 and have a third G3X panel for viewing weather, etc, or if I should go with a GTN750. The only thing that has ever bugged me about the GTN650 is not being able to see my COMM and NAV radios at the same time. It takes longer to make sure I’m listening to the right NAV frequency and actually caused me some issues during training where I kept forgetting to make the frequency active when I would load an approach because I would just forget about it. Out of sight, out of mind. But I’m not sure if it’s worth the additional cost to do that and not have as big of a screen. Still looking into that as I might be able to see both the COMM and NAV frequencies on the G3X instead which would fix my one and only issue with the GTN650 at this time.

    I ran across another RV-10 builder’s log this week as well. I couldn’t find any name to reference, but here is a link to his Blogger site:

    http://buildingrv10.blogspot.com/2018/02/a-tour-of-rv-10.html

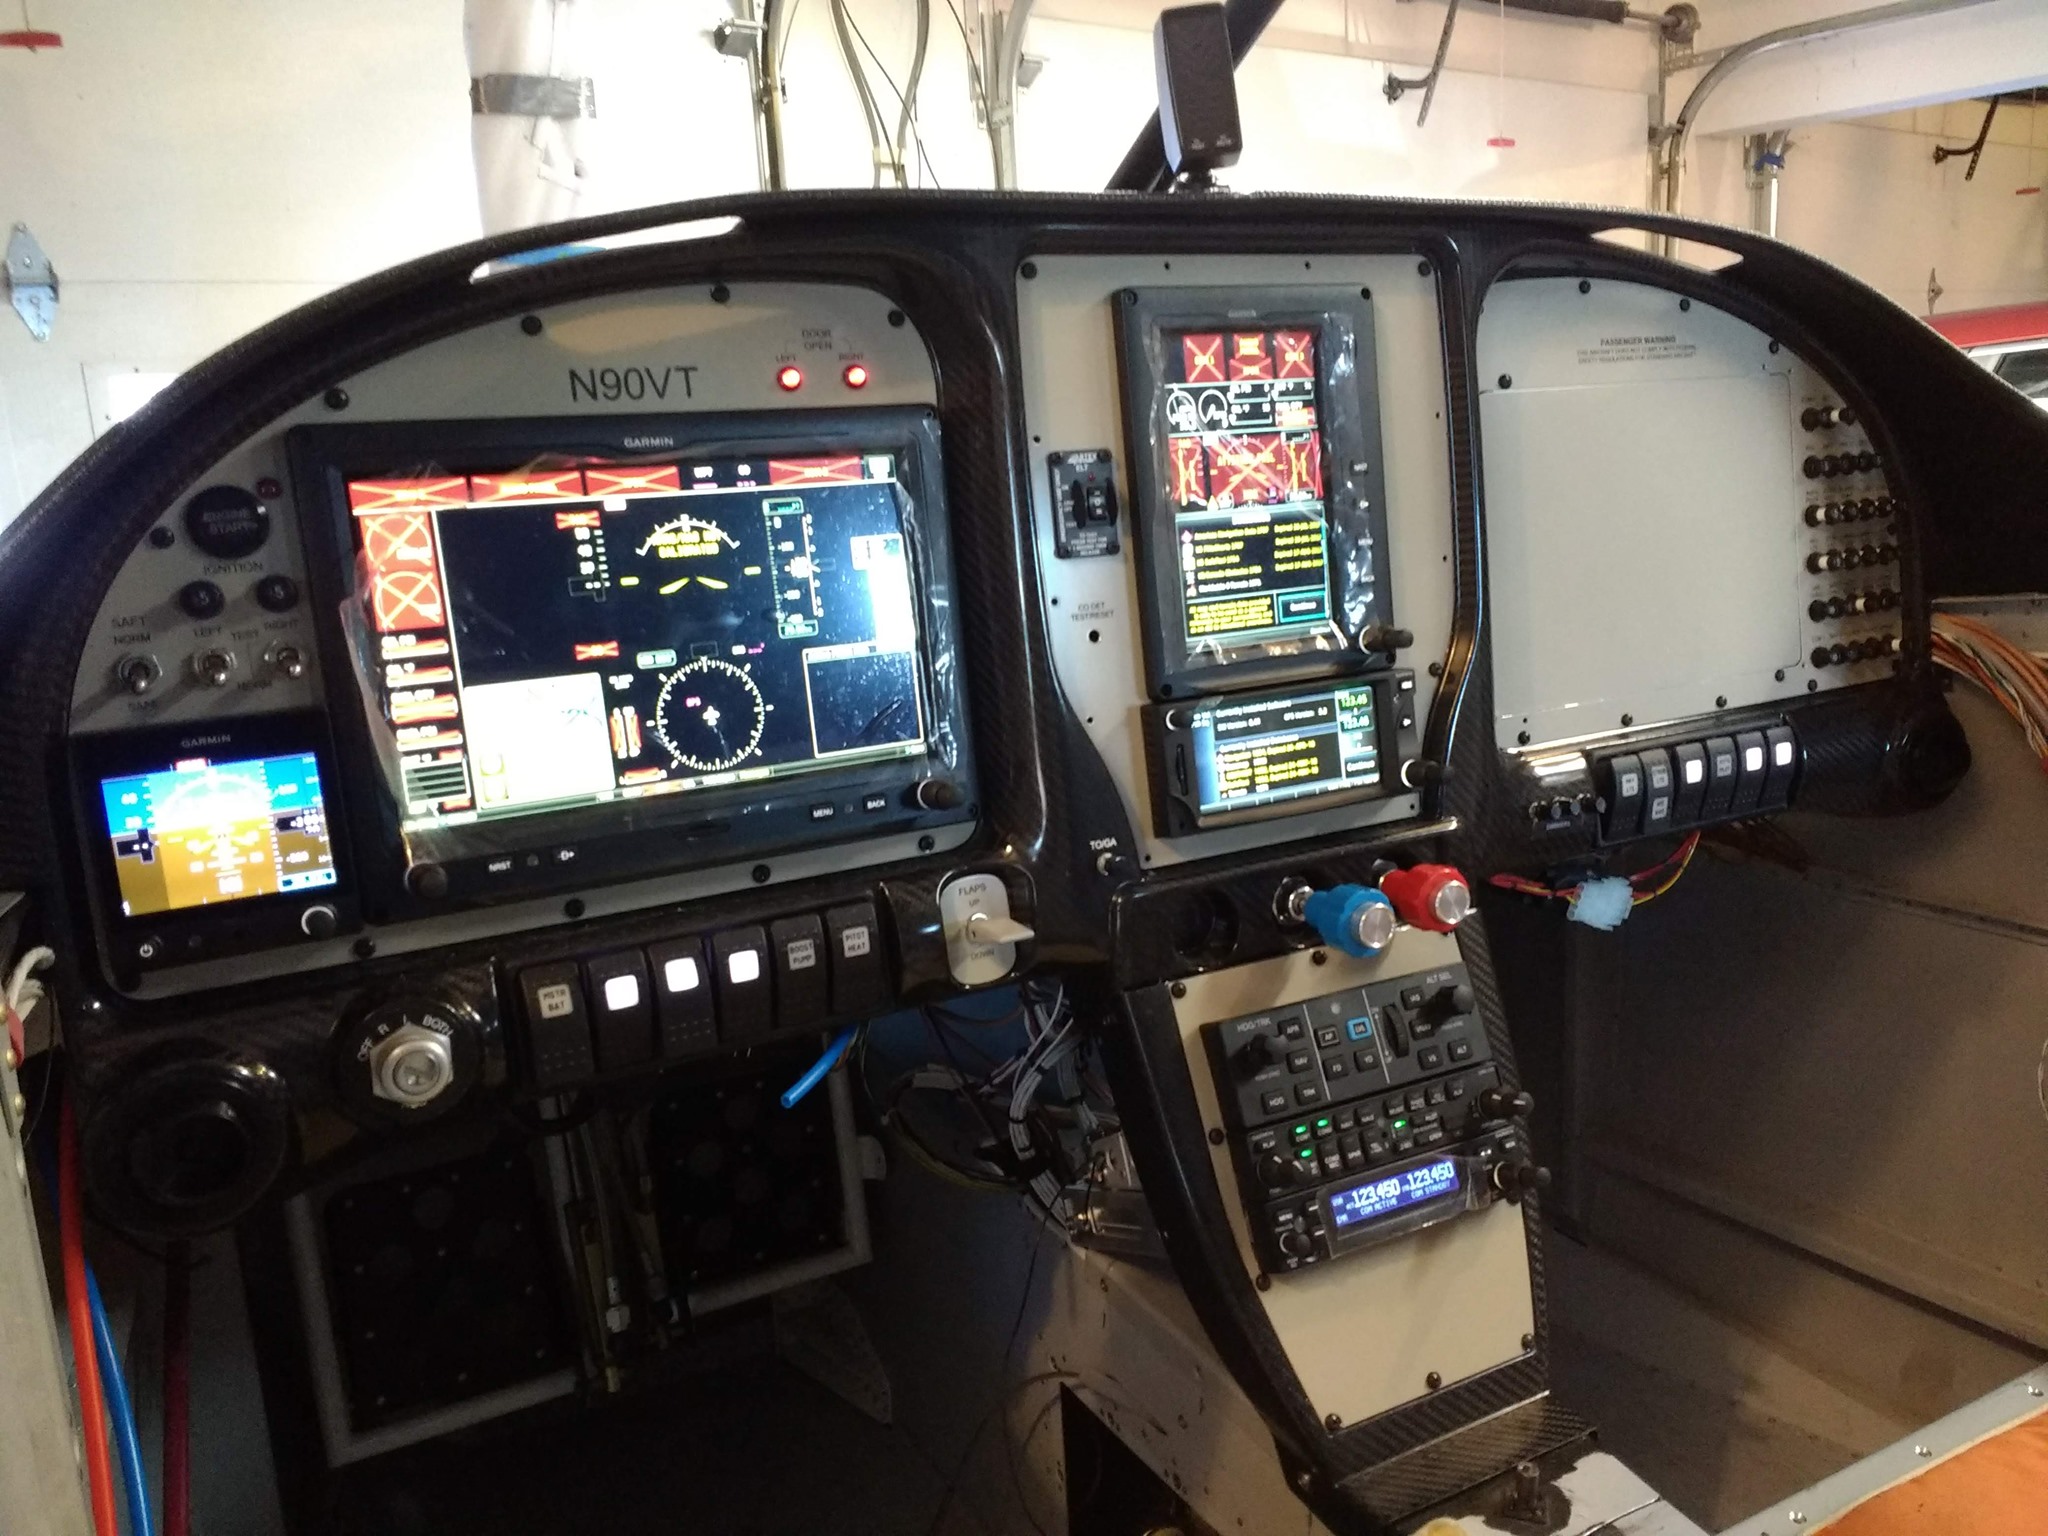
    He had an excellent setup as well that was more focused on his side of the plane and only used two G3X panels. I think that would put the GTN650 further out of reach than I would like, but if all of the functionality of the GTN650 is available through the G3X it might not matter. His panel was very clean though. Here are some pictures of it.

    Pilot seat view of the panel setup
    Passenger seat view of the panel setup

    I would have saved room on my panel by removing the autopilot controls, but it is still very slick. I like that he has a tertiary attitude indicator, but maybe that’s overkill? I need to see if both of the G3X’s rely on the same source for attitude information. If that’s the case then having a cheaper standby would be good to have in the event of an AHRS failure.

    Here are some more pictures of his panel with everything up and running.

    Pilot seat view of panel with all avionics on
    Center panel view

    I hope to get a good setup mocked up in some visual format. Again, having something to admire and drive to gives me the most motivation so I want to have alot of visual help to keep me going 🙂

  • Avionics & Panel Setup Research

    Avionics & Panel Setup Research

    I will say, this has been the most worrying part of this whole project in my mind. They don’t tell you much about how all of these systems interconnect when you are taking classes for your private pilot and your instrument rating and I’ve never looked under a panel to see how it’s all done. So not having a frame of reference makes this a little scary. I work in IT so I don’t believe I’m going to have problems figuring all of this out.

    I did a quick Google search for RV-10 avionics and panel setups and it brought up this really awesome video that Good Plane Living did covering how he setup his panel.

    Good Plane Living – RV10 Panel Tour

    I love how this whole thing is organized. He has his emergency related buttons in a small section on the left side of the PFD, flight related buttons are underneath the PFD, some accessories and what not underneath the MFD, and then he has all of his lighting on the ceiling of the cockpit next to the map lights and vents. Very well organized panel. I really like the center console controls as well. It’s a very natural position for anyone to have their right hand and is very much like a modern car.

    He had some interesting lighting that I had never thought of doing before. He has foot well lighting. It is in red so that it won’t ruin your night vision. He also has the normal map lights for both front and back. He also has a dimming switch in the front for the rear lights. That will allow you to disable the rear lights even if they turn them on if you don’t want to ruin your night vision.

    He has this all installed in an Aerosport Products RV-10 310 Panel system. It appears that if you don’t want the carbon fiber look, you do have the option of painting it over? They show a few different installed versions that are colored to match the interior, which is more the way I’m wanting to go.

    Aerosport Products RV-10 310 Panel

    I mentioned the center console throttle, prop, and mixture location earlier, and this product is also provided by Aerosport Products. It is their RV-10 Quad Arm Rest that appears to come in a version you can paint or the carbon fiber. It does not come with the fuel selector location that Good Plane Living has in his video it appears, so might be something to take a look at. I like the position for the fuel selector as it has always been in the floor board or against the left kick panel in previous planes I’ve flown and they’ve been a pain to reach.

    Here are the rest of the avionics he has installed:

    There are other components that are more than likely behind the panel, such as his transponder, AHRS, ADC, and other components. But I’m hoping as we get much further down the road that I will get a chance to talk with an avionics shop to see how best to setup the panel to fit my needs. I love this panel setup and the information it provides him, the only part that he didn’t mention that I love having in my current plane is the FlightStream 210 which interacts with my iPad. I might be able to get rid of a third screen in that panel and just use my iPad, or I could keep it. Decisions that will be made much later on!

  • My First In-person Look

    My First In-person Look

    I posted a request to see if anyone had an RV-10 that we could go see to the Central Oklahoma Aviation Facebook community a week ago when I was continuing my research about the RV-10 model. I had quite a few people let me know that they knew where one was, but they didn’t have any information on the pilots that owned them. I finally had someone that knew the pilot who flew an RV-10 that was very close by. I hit this wonderful gentleman up and he willing to oblige us with a view of his airplane.

    This plane is quite a bit bigger than I had imagined. This thing sits roughly 6’6″ to the top of the cab if I had to guess as it was a bit taller than me and I’m 5’11”. That’s not really a concern for me and is actually a welcome sight as it will have good ground clearance but also have good headroom inside the cockpit. The wingspan reminded me of the more modern Pipers, but was not as wide as the Cessna Cardinal I have partial ownership in right now which is always fun getting it back into the hangar as to not hit the wingtips on the doors.

    The one interesting thing was just how high the tail is from the ground. It is at least close to 4′ off the ground (again, I’m going by references to my own body, so I could be way off. This is my perception of the plane LOL) I’m not saying this is something that will keep someone from building this plane, it was just interesting how high it was.

    The interior of this plane was so nice from a dimensions perspective. It reminded me of the Cardinal on the front seat in being a good width for two people to sit in without having to be scrunched together like we were in the Skyhawk. There was plenty of room for feet both for the front and the back seats. Even the back had a great width to it. The luggage area is accessible from the back seat, even though you will have to probably get up a little bit and get behind the seat, but it is easily doable, just like how it is in my Cardinal.

    It was interesting to have the flight controls as a stick between my knees, as I’ve been so used to the yoke based control coming out of the panel. The panel in this plane, though a little older now, was still super nice! That’s one of the many advantages I’m seeing from doing this build as well. I will be able to get the avionics I want, placed where I want them.

    All in all, I was VERY impressed with this plane and it made me even more excited to order the empennage and start the build! I’ve posted some pictures of this plane that I found online as well as from his build website. you can go to his build website here:

    http://www.wingscc.com/N2GB/

    I’ve posted some awesome pictures of his plane below just in case he takes his site down or whatever.

    At KWVI on Sept. 3 2010
    Oshkosh 2009
    One of the few days with snow in Oklahoma
  • Paint Scheme Research

    Paint Scheme Research

    I always love to have an image to drive towards. I’m kind of a short sighted guy, and having an immediate vision of what I’m going towards is awesome and motivating! So I started, of course, with a Google Images search of just “rv-10.”

    So many good options came up from just that single search. I originally felt that having a white plane with a colored accent would be the way to go. I found this image that was on Van’s own website material for the RV-10.

    Awesome blue and silver accent colors on a white fuse

    The metallic blue from this plane was so beautiful. I’ve seen a few trucks like this that we also very beautiful especially in person in bright sunlight.

    I continued looking instead of just settling on that very common paint scheme scenario (white with an accent) and then I ran across this plane which was sold on Tomahawk Aero Services LLC website.

    Bright red and white scheme

    This was a little bit of middle of the road to me. Almost half and half in a way and with the color visible to the pilot while flying. But the white was still very nice looking. My wife knows that I am a sucker for white, especially if it’s done well like a metallic or a pearl. I still felt like it wasn’t exactly what I wanted. So I continued my search.

    That’s when I hit the motherload of awesome paint schemes! It was on the website named Planeschemer.com. This company has made some excellent paint schemes! I saw three specifically that were on an RV-10 and this dark cherry really caught my eye. It is such a deep rich color, and there’s still lighter accent colors that go well along with it. I also loved the silver that was used in the scheme. I felt this was very close to what I would want for my plane so that’s what I had settled on, well at least for now 🙂

  • The adventure begins!

    The adventure begins!

    I’ve been contemplating building an airplane for a quite a while. I remember seeing the EAA displays at airshows where they would have a wide array of RV’s, Kitfoxes, Highlanders, and the like. I remember getting the chance to see my first RV up close was when I was taking flight lessons with Monarch Air in McKinney, TX. The local high school and EAA chapter had built an RV-12 (pictured below) which peaked my interest and made me think this might not be too difficult after all.

    I had also watched Trent Palmer’s YouTube channel quite a bit. I loved seeing what he could do to his plane without having too many hassles to go through, and I loved the flights he would go on whenever he wanted. But, my mission was different for my desired plane though. I don’t have much land that I can go land on freely here in Oklahoma like they do in Nevada and Idaho. And I really wanted to travel more with my family and especially my wife when we become empty nesters (in a long time lol)

    That’s when I caught the content that FlightChops had put up about his recent visit to the Van’s Aircraft Headquarters and trying out many of the different RV models. I was fascinated by each of them and curious about the possibilities of what I would put in it. Then he started posting his build videos of his RV-14. That’s when the bug really hit hard. I saw that the process (though tedious, time consuming, and very detail oriented) would be something that I could take on and could get a fast airplane, custom built for me, by me, at a decent price.

    I ordered a practice kit after seeing it on the Van’s Aircraft online store (as well as a shirt… I’m a sucker for a t-shirt). I haven’t started working on it yet as it just arrived, but I’ve now found other channels and websites covering RV-10 builds specifically. I saw Brian and Brandi’s website with their build, videos, photos, cost log, etc. I then saw the Plane Lady YouTube channel as well as Jason Ellis’ YouTube channel covering their build’s and how they were doing. I was encouraged even more by seeing how the process went in detail through their videos.

    I then posted to the Central Oklahoma Aviator’s Facebook group asking if any local pilot’s had an RV-10 that they wouldn’t mind walking around with my wife and I. I quickly had 9-10 answers of people telling me where they knew an RV-10 was and I even had a few pilot’s willing to give me some of their precious time to see their babies. We plan on going to see them this weekend if everything plays out and I know I am super excited. So excited that I reserved a tail number and created this site! The tail number will be…

    N983RV

    I hope you join along with me while I go through the practice kit and go with me all the way through till the day I finish her! I plan on then converting this to a site covering our flying adventures, costs associated with the upkeep, and my whole experience with the RV-10 platform as it becomes a part of our life.