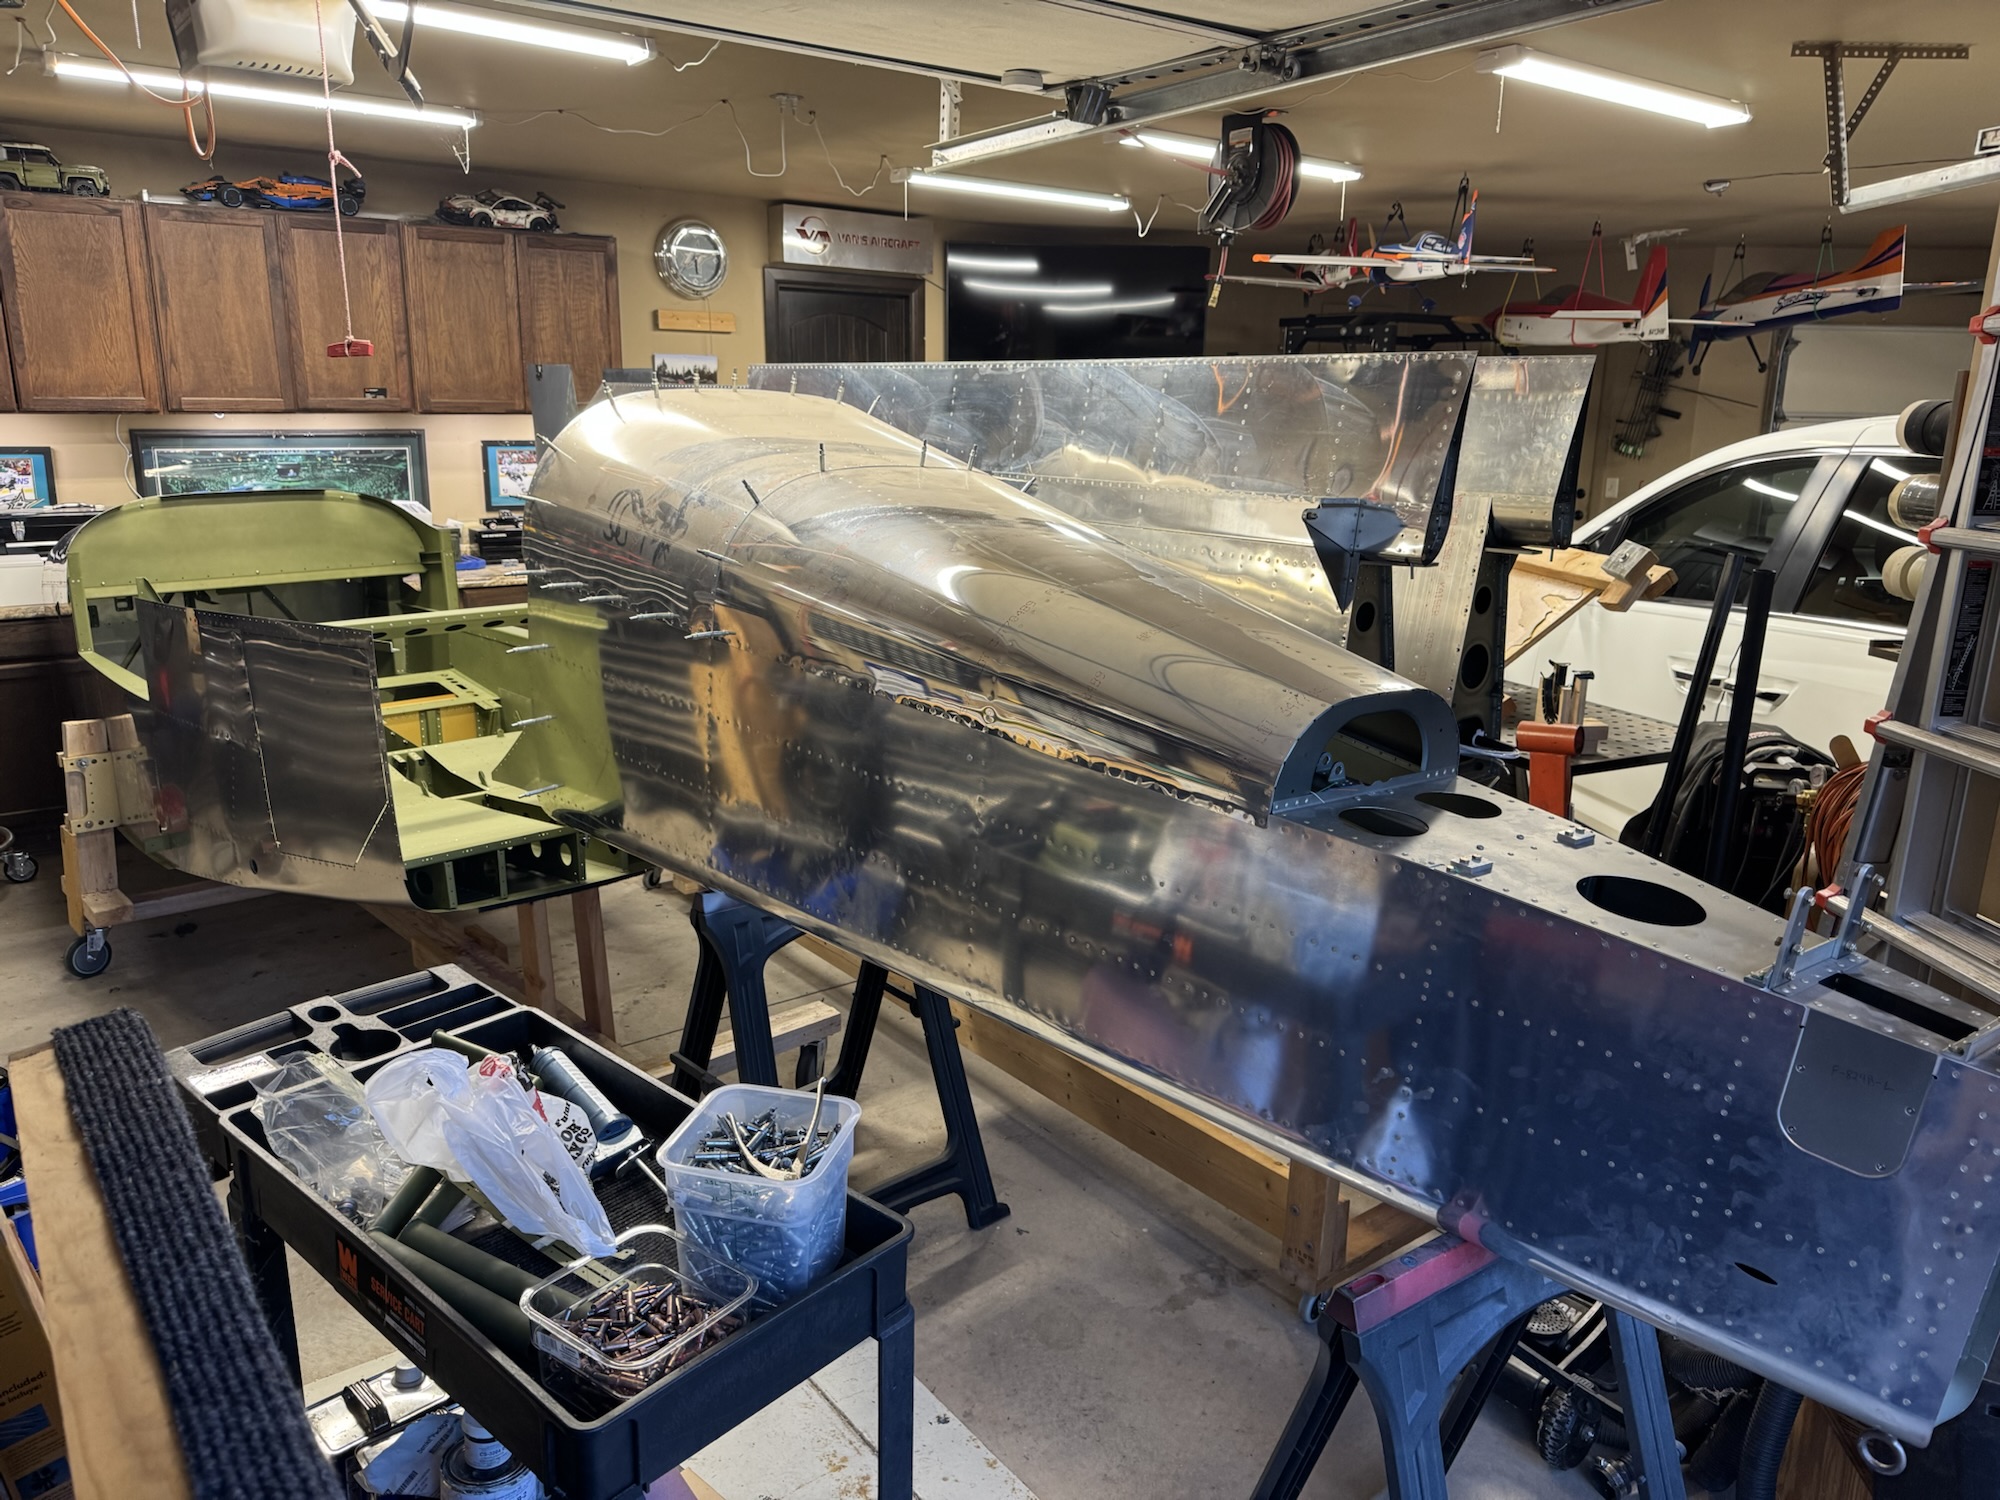
I spent quite a bit of time in Visio working on the block diagram. I know the components I want/need in the plane so now I just need to document how they will connect to each other as well as the redundant paths in case one of the methods goes awry. When Brendon got home from school I got him and Andrew to help me out in moving the fuselage to the cradle. It worked pretty well and it is surprisingly stable which makes sense with the main portion going through the spar of the plane. It is VERY tight in the garage right now so I will definitely need to take the wings to storage as soon as possible. I just need to find a safe way to do it. I will probably have to move them one at a time as I don’t think they will both fit in the trailer at the same time without overlapping and creating an opportunity for scratching. Either way, here’s pictures from the work today. Note: The block diagram is not 100% finished yet. I still have a bunch of documentation to validate what is needed, etc.
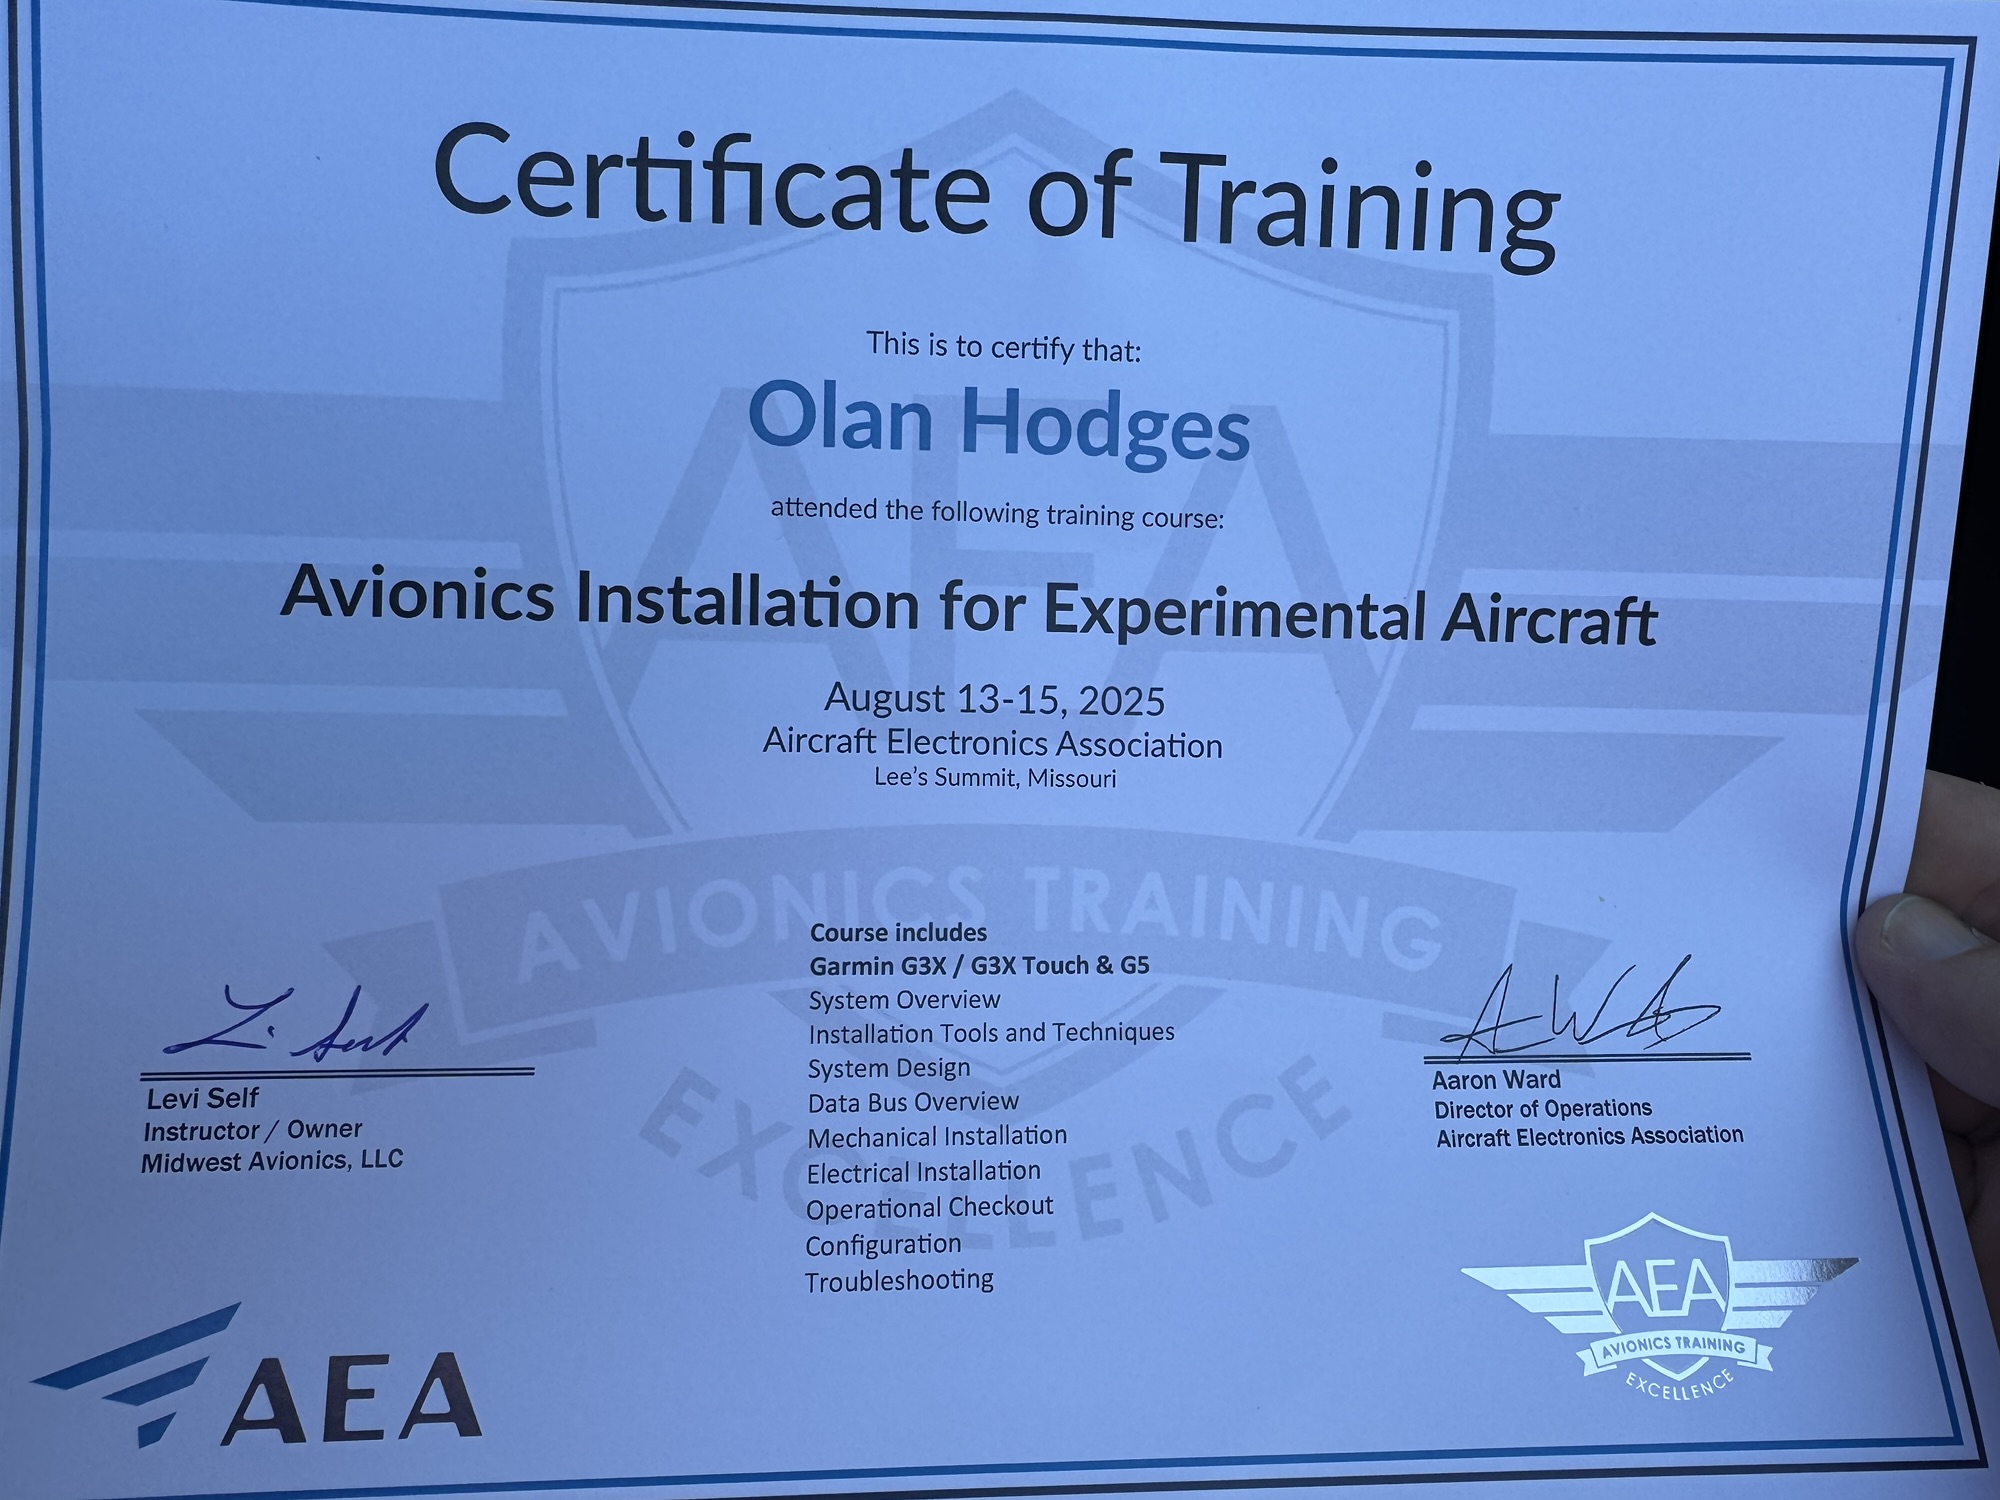
I graduated! LOL My harness worked first try which was a sigh of relief. This course definitely gave me a TON of confidence on completing the avionics installation on my plane. I now know which components I need for my installation, how to get them wired up, and what wiring needs I will have. I need to start by getting into Visio and building my block diagram, wiring diagram, and then (when I get more information on cable lengths I will need) my harness layout diagram. I got home tonight and I had a few tools and parts waiting on me. I got my nutplate jigs and I got the screws for the rear lights for my AeroLED VXi wingtips so I got those secured in place. I need to go ahead and get the harness completed for that now that I feel confident in doing that. I also need to get wiring harnesses in my wing roots so that I can connect up those components to the fuselage when I get the wings mounted. All in good time!
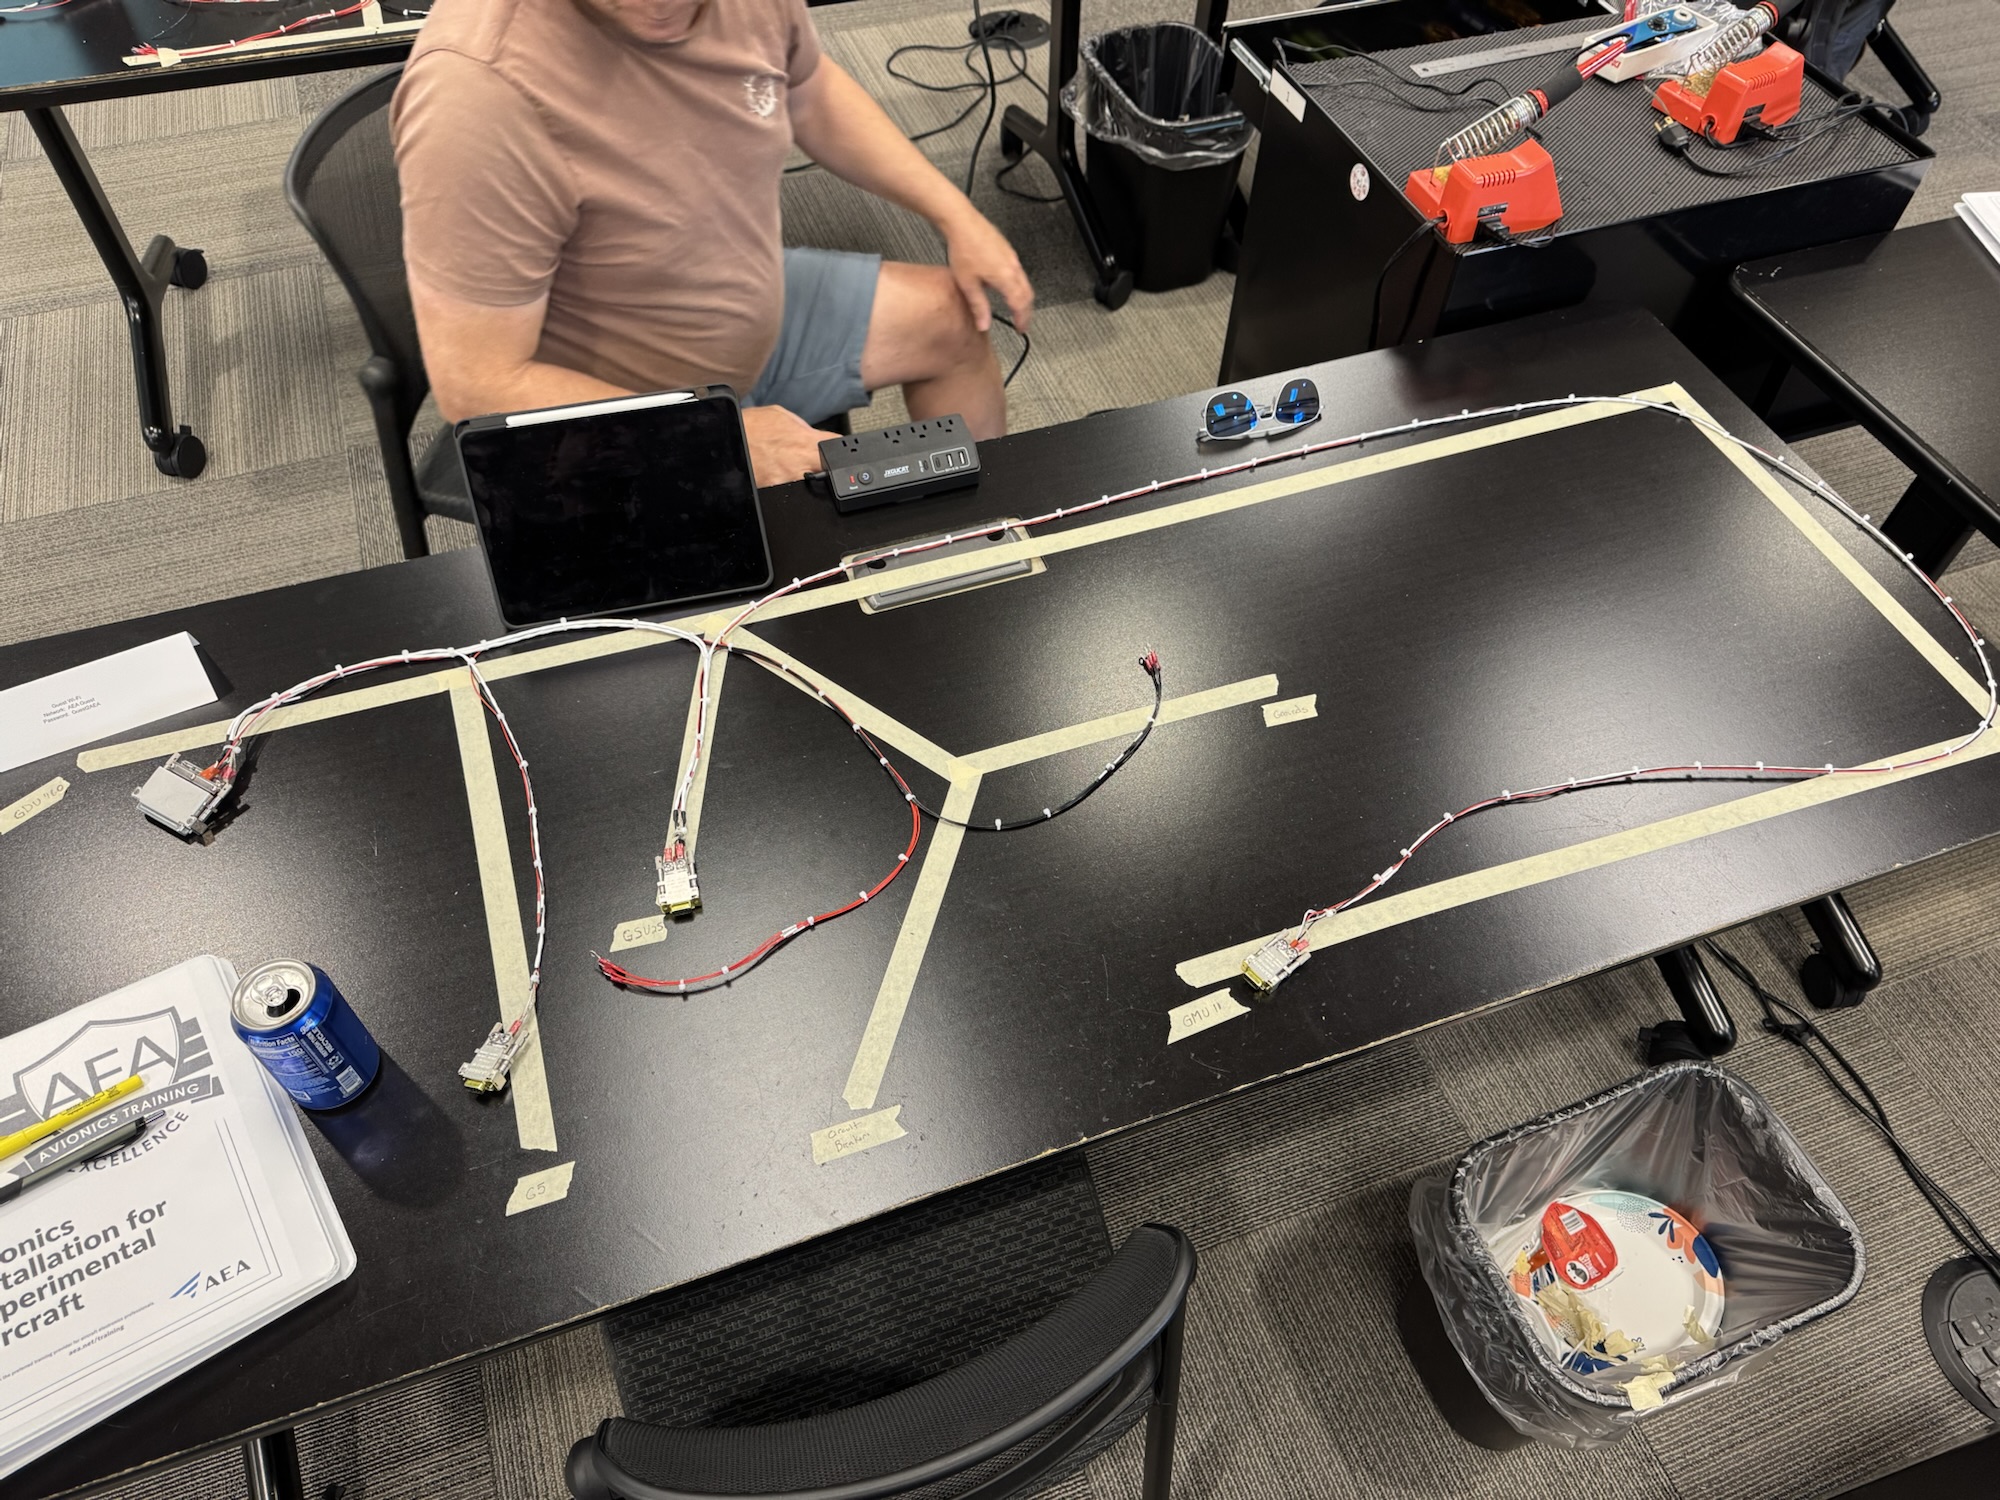
The second day was excellent. We learned practices for system design starting with our mission, equipment that will support the mission, how we should design and place it within the cockpit, etc. We also went over the different communication methods like RS232, ARINC, and CANBUS. CANBUS is primarily what the G3X system will use so it was good to learn some of the basics of that. We then learned how to wire the CANBUS together with window splicing. I finished the harness today but I wasn’t super happy with my connection to the GDU and the GMU. I didn’t terminate them all to the same length and it caused pillowing in the harness. Luckily I got it some what ironed out on the connection to the G5 and the GSU so those looked much better. All in all I was happy with the class. Tomorrow should be fairly short and then I can drive back. I am guessing the Garmin rep will show up tomorrow as he was supposed to show up today and didn’t.
The first day of class went fairly well. Levi Self from Midwest Avionics was the instructor for the class and he did an excellent job of answering our questions and the content was well organized. We covered the regulations for an avionics installation (what you want to include, how it should be done, etc) and they briefly covered the major brands of avionics. We then hit the topic I was the most interested in which was the tools we would need, and how to use each of them. Some of the pictures below include the toolbox contents, and some of the examples of the terminations I did. I ordered a few tools and some parts to label my cables that I’ve already run in the wing. The only one I didn’t buy yet was the DMC AFM8. I have the generic tool already for this but since this tool is just over $1000 with all of the dies you need I think I’m going to research this first before I buy it. Luckily I have quite a bit of time before I need it anyways.
We ended the day by laying out the wires we would need for starting our harness we are building for the test stand. I’m excited for tomorrow where we start going into systems design, planning, documentation, etc. I need to start working on that as I research through the Garmin G3X manual on the pinouts, interconnections, etc. so I can then determine locations of devices, length of wire runs, etc. Just so much planning that I need to work through. Luckily they use Visio too so I’ve already got a leg up there on documenting my system design since I know Visio.
I haven’t gotten out to the garage yet today, but I will when I get home from work. That said I did go look at the left tank and the balloon was still inflated by it was 1/2″ shorter. That could be from cooling of the air so I’ll see when I get home after it has been hot in the garage all day if it goes back to being 10 1/2″ but this is VERY promising on the tank I thought was good. I did not yet pressurize the other tank as I want to give it a full 24 hours to cure before I put pressure it in and see if that leak is sealed up.
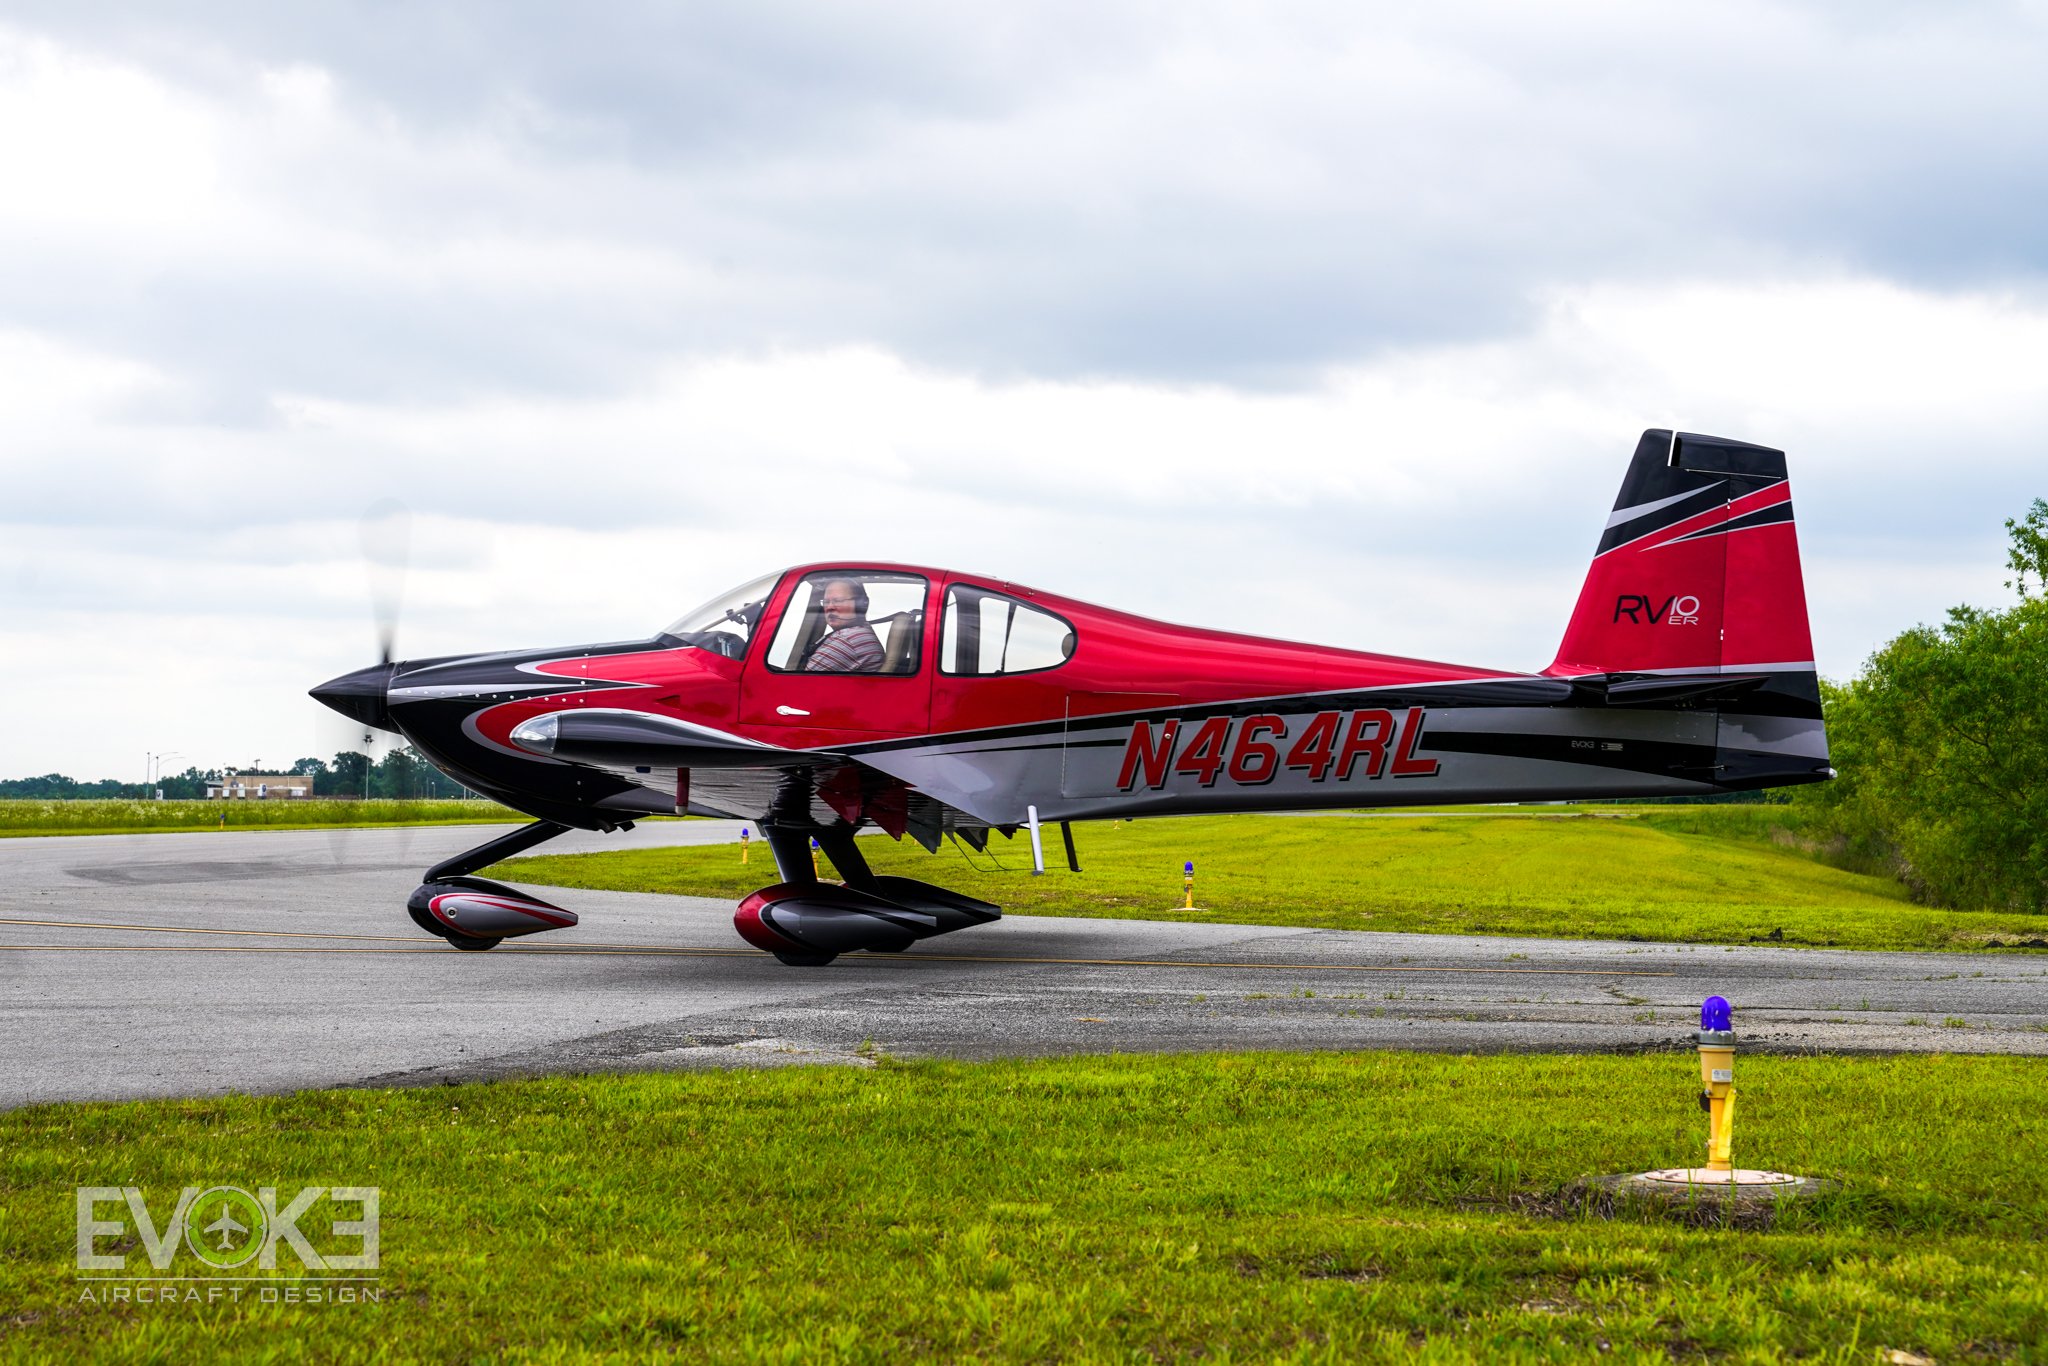
That aside, I wanted to put this paint job up from Van’s Aircraft’s RV-10 so I could remember it when talking with Evoke. This design is enough of the “old school” and the new school edges that I want something similar but color wise I’m not yet 100% sure. I want something patriotic in color scheme as I love the red, white, and blue scheme. Either way, these were great ideas to get my design started.
There was also this one that I saw on Evoke’s website that has some of the flowy old school styling to it, but I also like it.
Also, this is what I am going to do for AC while we are on the ground. I don’t want to add the permanent weight of an AC unit and I think this will be just fine for while we are on the ground. It is from Aircraft Climate and it is a bit on the expensive side at $1500 so I might have to figure out a way to do this myself. You still have to add the remote to it as well which is another $100.
I was looking at some of the Evoke scheme designs that they have publicly available after seeing their design work on the Van’s Aircraft RV-10 that was on display at Oshkosh this year. I really like this design though it is a bit darker than I would want. Maybe some white instead of the grey? Or something, I’m not sure what. I need to get with Evoke or Scheme Designer’s and get my design completed already.
It has been too long since I’ve been able to work on the airplane. Kids’ activities (and the volunteer work to go with it), church service, my school work (I’m now working on my MBA through WGU), and trying to spend more time with the kids has taken alot of it from me. I hope to try to swing more time with my kids while building the plane as they showed interest in continuing to build with me while we were at AirVenture this past week.
AirVenture was a blast as always! We plan to return in 2026 and make our avionics purchases then. We are going to purchase the quick-build fuselage next year along with the finishing kit and firewall-forward kit. So hopefully we can pick it all up at the same time around the same time as AirVenture 2026. We plan to drive to Oregon to pick it up as it will be an opportunity to see their facilities and plus it will be saving quite a bit of money in freight costs and it’ll be a good time for my wife and I to spend time together in the car.
My wife and I visited the new display plane that Van’s had for the RV-10 model. It was very well done and I even got a chance to sit in it. It reminded me of what we are shooting for and is giving me more desire to want to finish the plane!
While as AirVenture I did two fiberglass classes. One was the short snippet of the fiberglass for RV’s class put on by the EAA. It had some great tips for how to cut the fiberglass, how to work epoxy into it, shape it around difficult shapes, etc. I then took the fiberglass 101 class, which had a hands on practical at the end. It was great to get some very basic experience and it gave me the courage to finally start tackling my own fiberglass work at home. I had also taken their fiberglass 101 class online back in January and I ordered the practice kit, but that did not arrive until early July because it was on backorder so I just decided to wait until I could take the class at AirVenture to have someone there with me. I want to do the practice kit at home now to solidify more of what I learned.
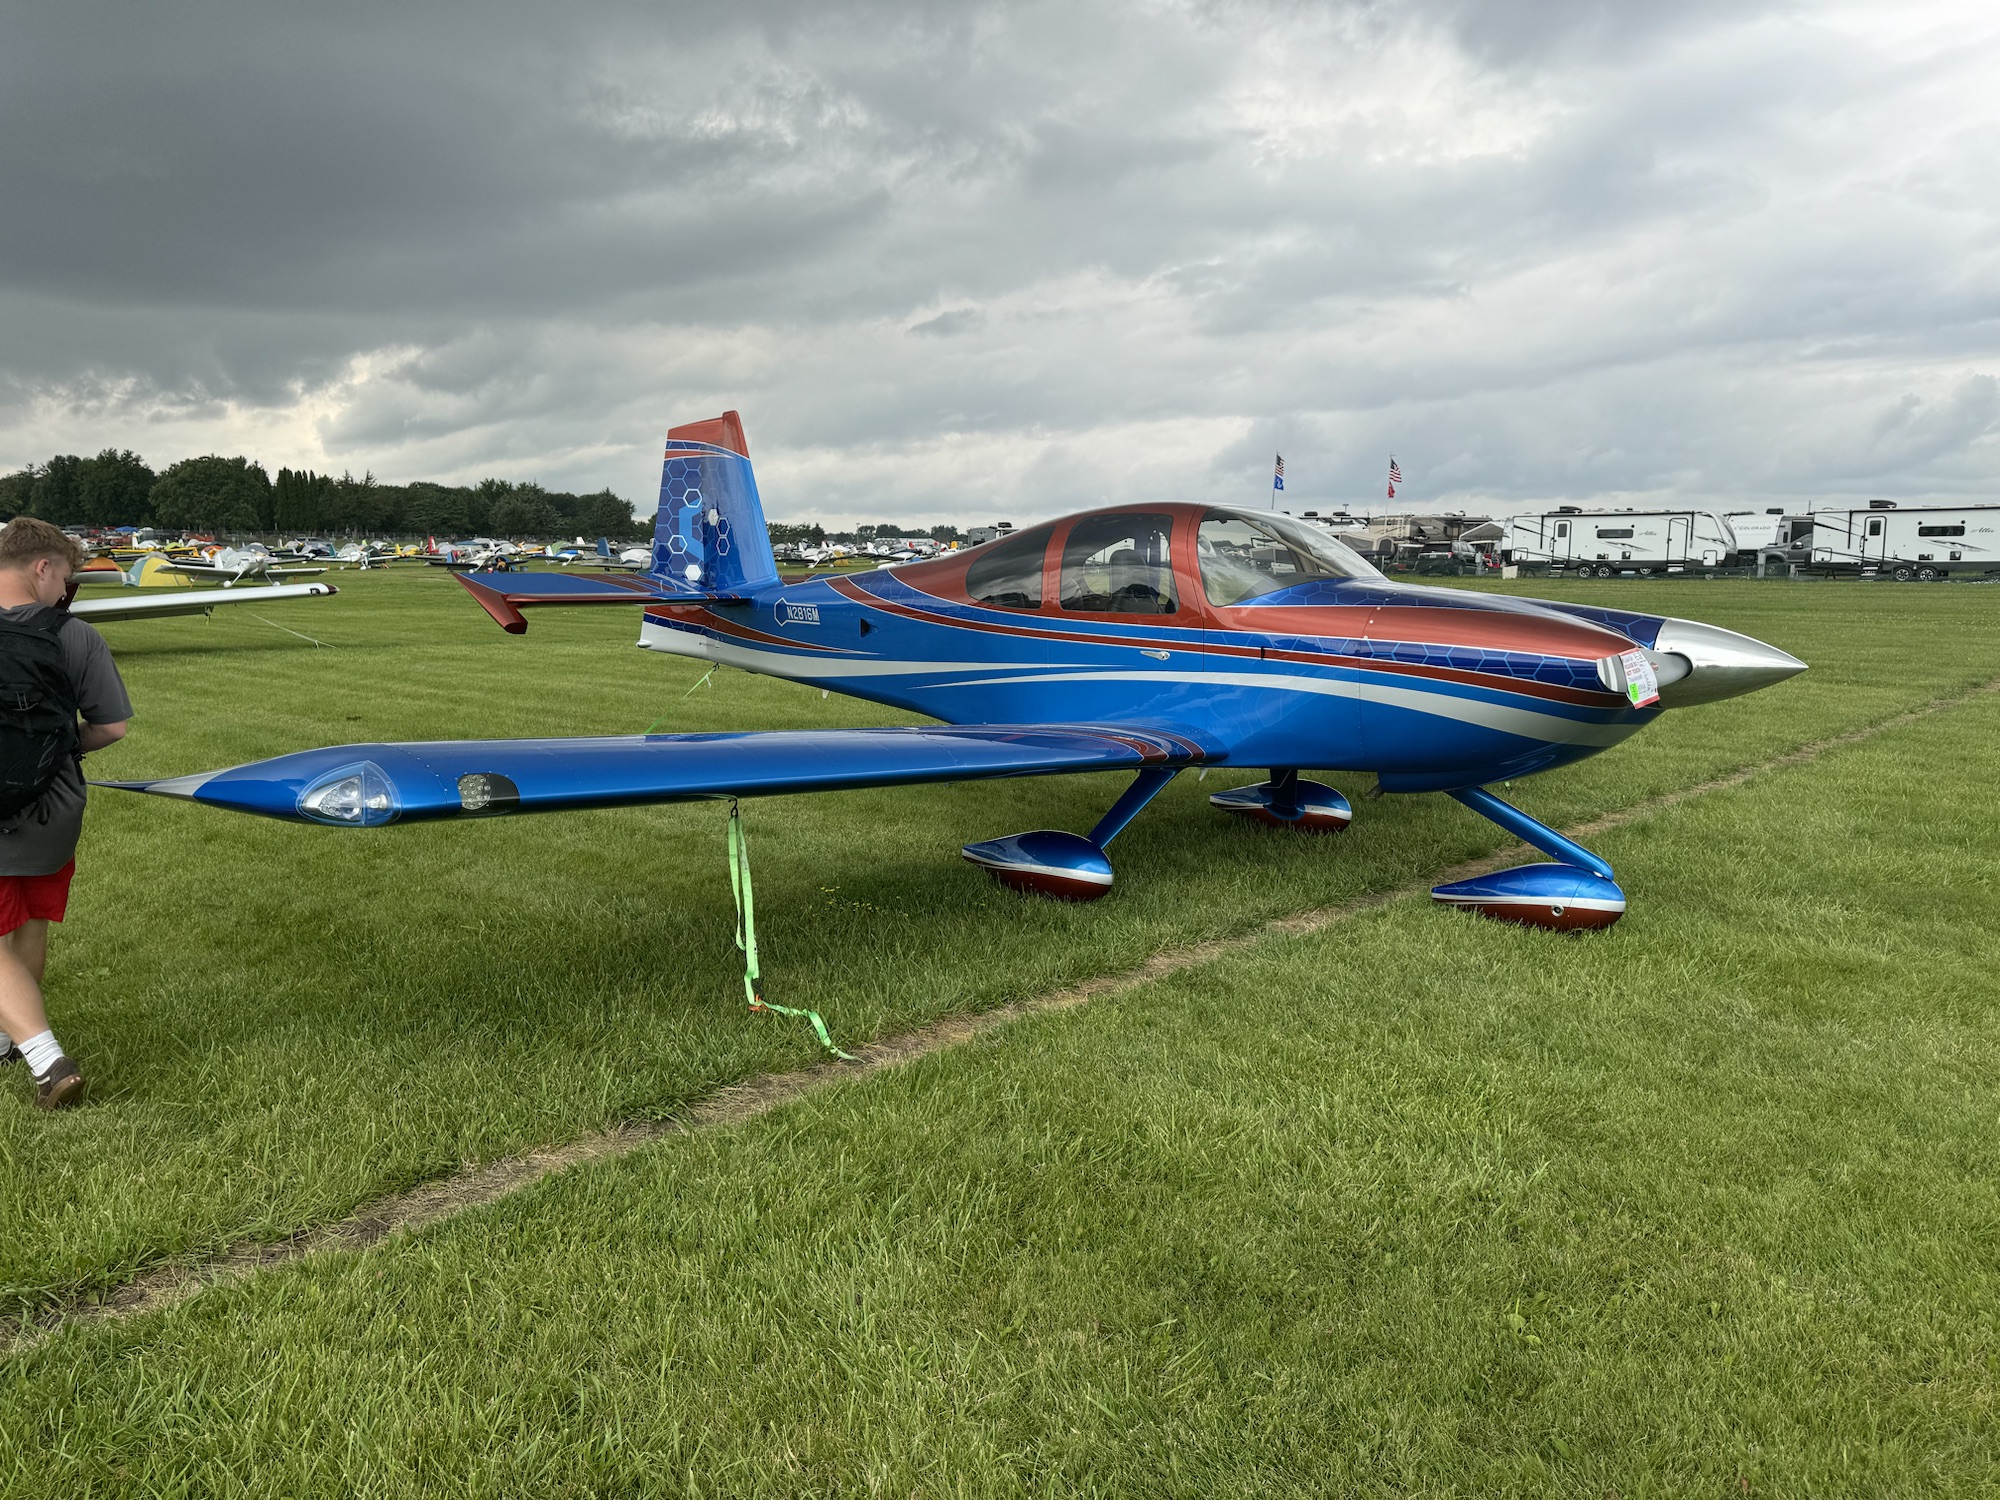
The one RV-10 that stood out amongst all of them (of which there were many super great builds) was this one – N2816M. I’m not a fan of the paint job personally, but the level of detail on this plane and how well things were done was superb! I didn’t take a picture of this but he put a wedge on the left side of the rudder to tune the yaw in the plane. It was very nicely done and almost invisible to see. Better than having to put a trim servo in or some other mechanism. He also had fiberglassed all of the open control surfaces so it looks very smooth and didn’t have the open weight reduction holes.
I started working on shaping the foam block to back the rear portion of the horizontal stabilizer tip fairing. It took a long time just to get where I am now but I’m still not satisfied with it. It is close but it is still protruding too much on the edge. I hope to get that shaped appropriately tonight when I have some time after church.
I saw an interesting way to layout the overhead panel. First I saw that this builder had put almost all of his fuses/circuit breakers up there. I kind of like this as it cleans up the panel where you are most of the time and makes it easier for me to reach them as most planes I’ve flown have had them down below the passenger side, or along the right side of the passenger side. I’ve even had some that were on the floor panels which made it a pain to read which one was which. I also noticed that his reading lights had different color modes! I thought that was awesome so that I could turn on the red, blue or green depending on which one I wanted or just use regular white light. Very cool setup!
My family and I went to Oshkosh this year and stayed the entire week (Mon-Fri). I am overwhelmed with how much there was to look at, watch, and to learn about while I was there. I wanted to list some of the key takeaways from Airventure and lessons I learned for future reference in this build.
Engine Selection
I got a good chance to look at the Lycoming engines and the different options they have. I thought an IO-540 was an IO-540 but they have a ton of different submodels. The D model is what Van’s recommends and sells, but I’ve seen in forums where some users are using the K model. I also found a plane that was using an X model but I am not finding reference to that on Lycoming’s information. I’m going to have to search around on the Van’s Air Force forum or other places to see what that engine is. I couldn’t find the owner as it was just parked out there and I even waited some to see if he/she might return but no luck.
They had the IO-580 on display which had the exact same dimensions as the IO-540 except for it’s height. It was 2 inches taller. But the power you got from it was very impressive. It was achieving 315hp in almost the same footprint. I decided to not go with it as it is not what Van’s recommends, and after reviewing some of the Van’s forums there were some issues with running the recommended props on anything higher than 300hp. I am looking to get as close to the 290hp I can get though which I am looking to see about that K model IO-540 and if it is worth upgrading to, or should I just stick with the IO-540-D since it is cheaper.
I also read through their marketing for the Lycoming EIS. It is definitely super nice, but it looks like they designed it to replace existing magneto based installations and not brand new installs. So this might not be something I get but it was cool to see and learn about.
Avionics
I visited with vendors from Garmin, Avidyne, Advanced Avionics, and Dynon. Garmin was the most complete. They sell everything you would need to make this function so it’s almost like an easy button to get your avionics suite setup. I am almost much more familiar with their products as I’ve flown with them since I started flying either with the G1000 the 430s or the 650s. I was also very impressed with their Garmin Pilot EFB! I had never used it before but it was very well done and might be something I switch to if I end up going Garmin in the plane.
The next I was impressed with was Avidyne. The look and feel and usability just seemed more fluid and I already understood how to use the majority of the system because their IFD550/545, IFD540/510, and IFD440/410 looked almost like a Garmin 430 and the larger 530. But that was also my hangup. I’ve gotten more used to the GTN650/750 which has more screen real estate and fewer buttons. It just felt a bit dated with those buttons on the outside. But I could also see the advantage of keeping those buttons with getting quick and tactile access to commonly used functions. They also had the IFD100 iPad application to go with it that made remote control of the radios much easier even in turbulence if you could just use it on the iPad. I didn’t like their PFDs as much, but they were okay. Avidyne did not have a complete package as well. You would have to work in a hodgepodge of different components to make it work. This might not be as bad as I’m thinking it would be, as my current experience of working with multiple vendors to make a single solution to function properly constantly has each one of them pointing fingers at the other. I’m imagining this would be the same situation if you had an issue between these disparate systems.
The final one that I was interested in was Dynon. I really loved their PFDs. These were super nice and I loved the angled button edge which would allow me to perch my fingers on during turbulence. They also had a really nice refresh rate and made their display smooth. They didn’t have a navigation solution and would have to be supplemented with an Avidyne or a Garmin, but it seems like they have everything else. Their autopilot looked like it would fit the bill for me, the remote radio panels were really nice to segment the radio coms to a separate panel, and I liked how they already had package examples setup for different levels of equipment. Of course I liked the Airliner package as it had some great screen real estate, but I don’t think I would need that third PFD. But the Cross-country Cruiser was also a nice package, but I would just want to add the navigation source like an Avidyne or Garmin. I would want to get people’s experiences around each of these different platforms before I made a final decision. Garmin was a bit more expensive, but they are also giving you a full platform to implement and they are also using newer and faster communication styles such as Ethernet with Serial backup.
Below are some Avionics installs that I liked and their placement. They all had good cockpit flow to them and some of the commercial ones I’m imagining they have put alot of research and development behind to make sure the flow was good.
Propeller
I had a really good and lengthy discussion with the Hartzell team in regards to the propeller and how I should select it. He stated that getting a two blade prop would give me good top end speed but sacrifice takeoff performance, while the three bladed prop would be the opposite. I honestly have never looked into those details so it was really good to get some details on why I would select one prop over another. They didn’t have any printed material for me to look at but they showed me that they have details on their website regarding specific props for the RV-10. They also suggested that I talk with Van’s as well as go through the forums and see what other’s have done and how they feel about its performance.
Lighting
I was absolutely sold on the AeroLED’s solution that they worked on with Van’s Aircraft on their new carbon fiber wingtips. The AeroSun VXi wingtips are going to be an almost all in one solution for my lighting with its NAV, ACS, POS, and Landing/Taxi lights all in the wingtip units. The only additions I would want is the Suntail light for the back of the rudder as well as the Sunbeacon II for the beacon light. But I’m still mulling that over as they stated these wingtips will meet the requirements for lighting across the board. The fewer cables I have to run and lights I have to support the better.
Avionics Installation Partners
I spoke with Aerotronics as well as SteinAir. I was very impressed with SteinAir in regards to the existing portfolio of RV-10s they have done and the amount of interior design parts that they have designed and support, outside of just the avionics panels. But I don’t want to rule Aerotronics out as they did have a good presentation as well in regards to their experience and capabilities. They were familiar with all of the products I wanted to install as well if I went with Garmin, Avidyne, or Dynon.
Paint
I got some awesome ideas from just looking at the different RV-10s that were out there as well as just any airplane I passed by. But in regards to working with any third-party to help design a scheme I talked with Scheme Designers and Flight Lines. Both had really good portfolios so I’m kinda split on this. Plane Schemer was not there or I missed them, but I’ve been working with them before and they also have an awesome portfolio. If I had to pick today it would be either Plane Schemer or Scheme Designers just for the portfolio experience and designs I saw. Flight Lines was good but their portfolio seemed to be more simple in their designs.
Awesome RV-10s I Saw
Here are some of the amazing RV-10s I saw and I’ll talk about what I liked the most about each of them.
This plane had some super nice features that I wanted to replicate. First off, I love the cowling. I was talking with a gentleman that was with me looking at it that has an RV-10 already and he said that the Vans cowling can allow it to get a bit hot sometimes since it’s cooling isn’t as efficient as this one. Apparently this cowling has a duct that goes directly to the cylinder heads instead of having an open area that you have to put in those rubber barriers to keep air where you want it. I also liked his three blade prop. It was super nice carbon fiber and I bet it is pretty light weight. I’ll have to look into that. I liked his gas cap covers for some reason lol. It just looked super nice and clean. And finally the cowl was put on with screws. The gentleman I was with said that the piano wire hinges that they have are susceptible to breaking. I’ll have to look into that as I didn’t quite like seeing so many silver screws out there as it took the attention away from the red color.
This was a really nice design, though I think i would like a brighter contrast. It’s not showing up well in these pictures but that white was more grayish. I would want a very solid white there to pop against that blue. That blue was a very pretty color as it was very metallic. It was a really nice paint scheme though.
This plane scheme was really nice if you wanted to go dark. The flowing lines worked really well, even though you couldn’t see all of it with the cabin cover on. It was really pretty though. That red if I’m remembering right had an orangish tint to it.
This was the coolest from just a design perspective. I would not want my plane painted this way but it was a piece of art! It had a section of the plane devoted to each of the armed forces. It was a really cool idea and I think it was done well!
Finally, each of these had really good components to them so I’m just going to group these together. Enjoy looking at all of the different RV-10s we saw!
I was trying to get everything more fleshed out in terms of how things will look in the interior, exterior, avionics, etc. Specifically with the avionics as I want to make sure that if I need to install any servos, antennas, sensors, etc. that I am getting them installed at the most opportune time.
I started off with the interior as that seemed to be the easiest to start making decisions on. The Aerosports company has some really good looking panels and center consoles that I want to make sure to include in the build so I decided they might be the best place to get the entire interior from. You can see more what I selected, but I specifically liked the quad center console as well as the overhead console.
The layout I am looking to use with the G3X Panels, throttle quadrant, fuel selector, etc.The rendering of the overhead console
I think started looking at the paint job. I sent a few emails and Planeschemer came back with a very quick response! I’m imagining that it is a canned response, but it was nice to get access to more of their example work that would give my wife and I an opportunity to see what we wanted to select. We are definitely looking more towards blue as the main color, which I think this scheme I’ve already found but with a dark blue instead of the dark red would be excellent.
I like that it has plenty of white and grey/silver with the black accents, but then having some dark blue like a midnight blue pearl.
Then on the avionics I found a really excellent website that a builder documented the exact layout of his avionics. It gives me an excellent starting point to figure out what components I need to start planning for and I’m including his research here just in case his site goes down.
This layout was very well designed. The one change I would like to make is to push the middle screen further up and try to fit in a GTN 750Xi. I would also have a second radio that is able to receive NAV signals so that I can do true IFR with two NAV radios. The GTN 750Xi would have one COMM/NAV radio and I plan on getting a GNC255 as my secondary COMM/NAV radio. If that changes then great, but the remote COMM unit that the G3X has seemed to only be a COMM radio. I would push down the autopilot and put that second radio just below the GTN 750Xi and put the audio panel just above the autopilot.