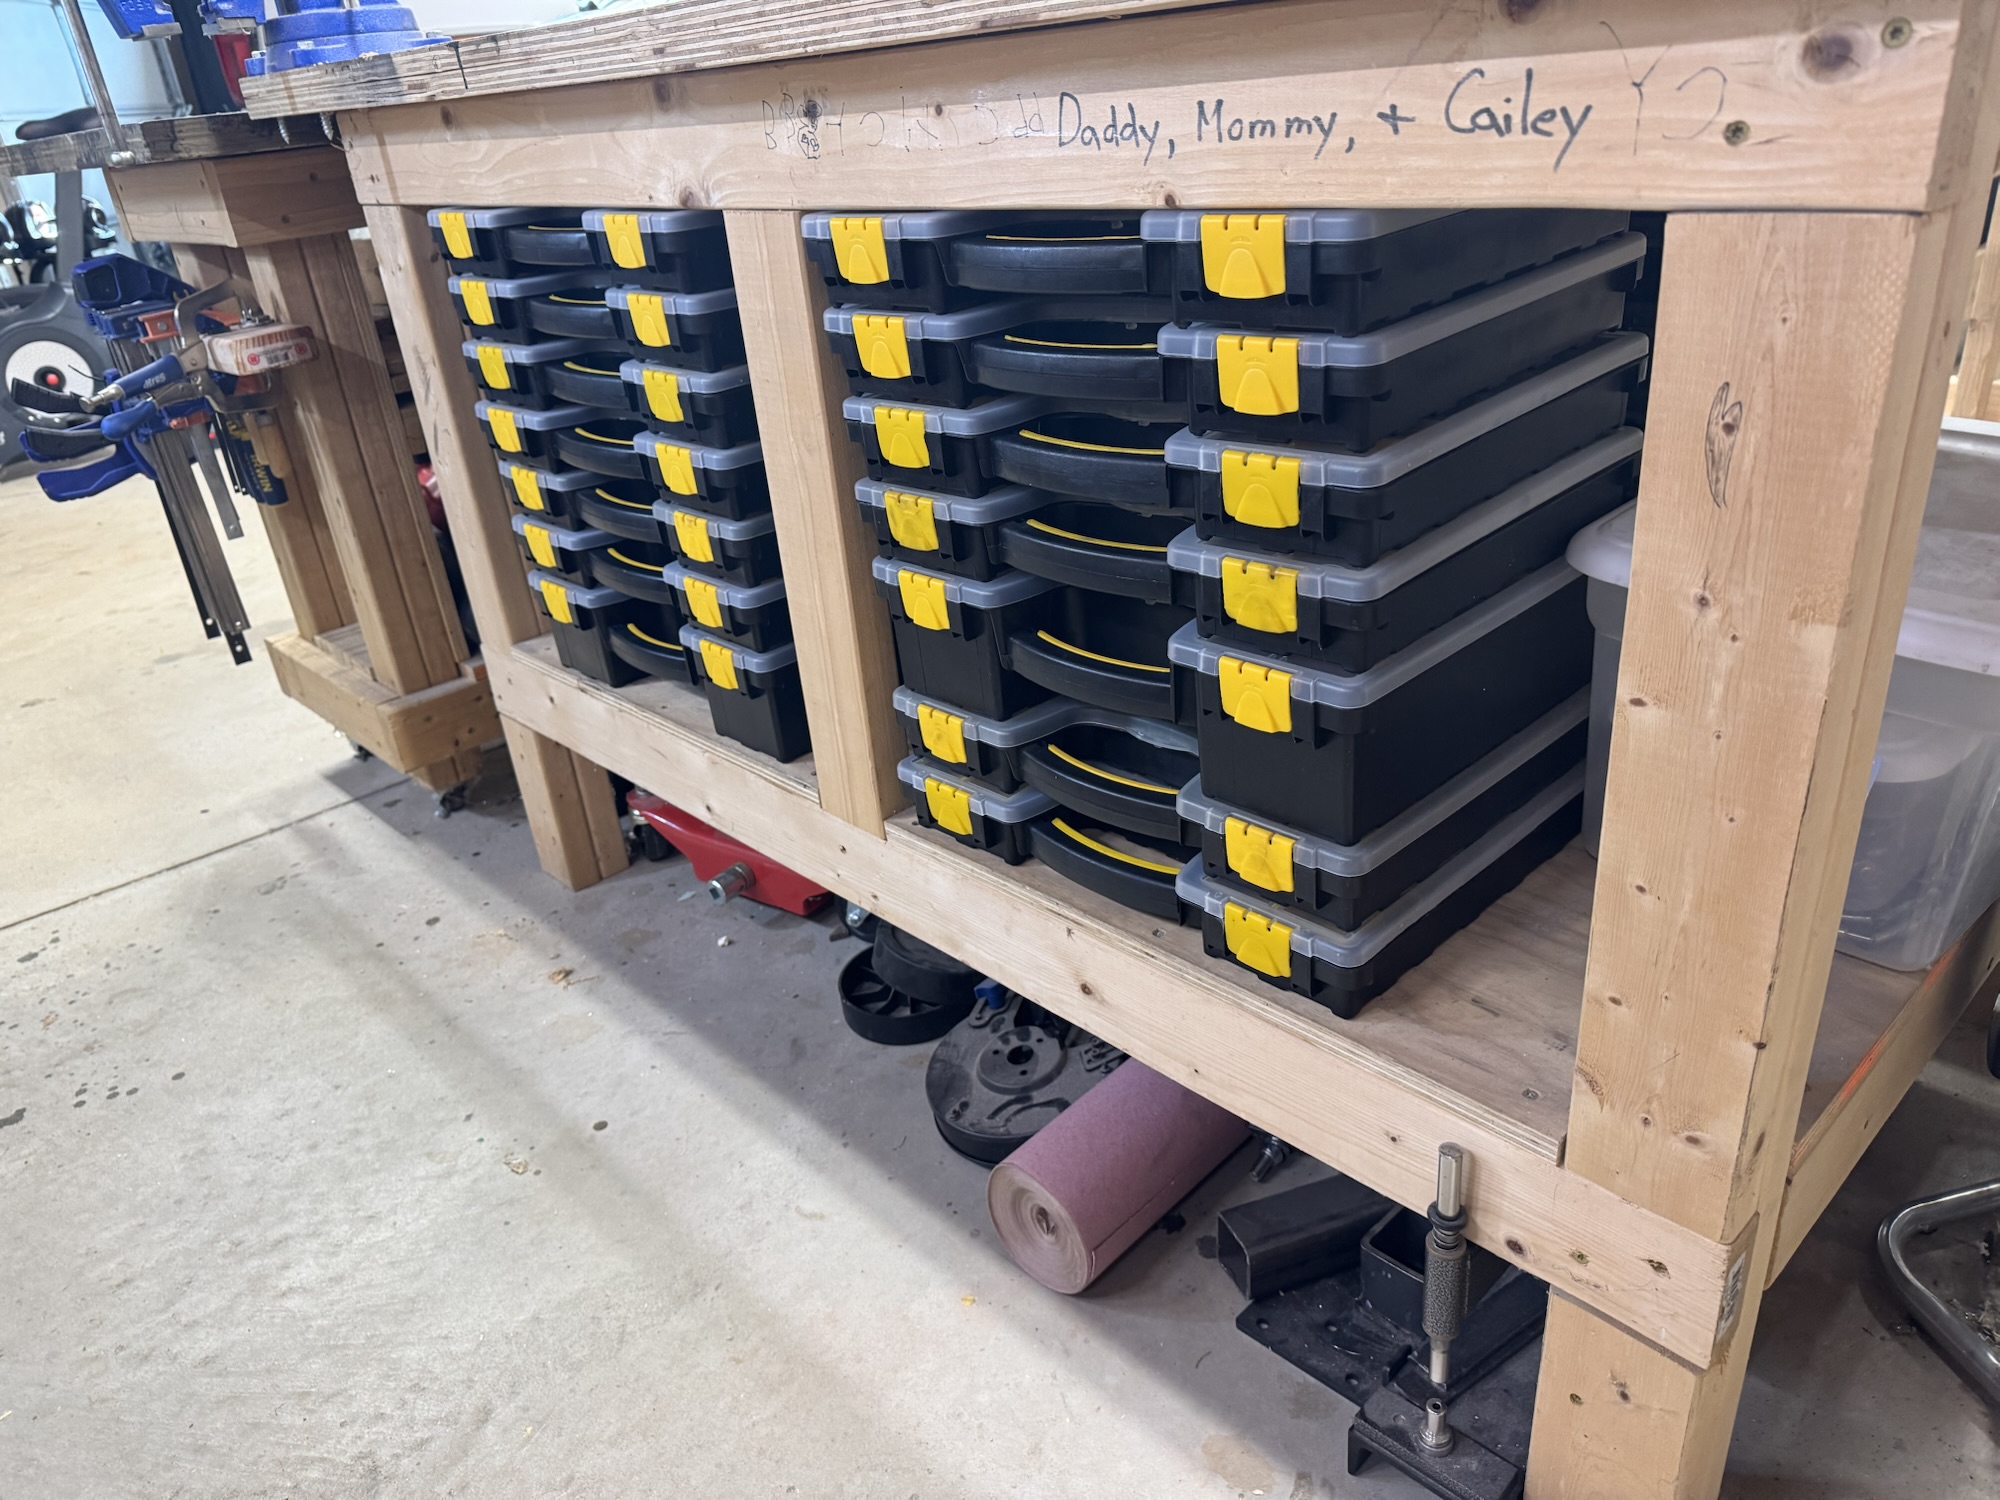
I’ve been extremely busy with church related activities as well as trying to improve my own processes while building. I am constantly dealing with my poor organization of my hardware (minus really my aviation hardware which gave me an opportunity to try things out). So I finalized organizing all of my hardware so I have more space to store tools and other items out of the way while I am building, like my bench vice, grinder, bench sander, etc. I also organized my clamps which was simple with just a 2×4 with some pocket screw holes added to my existing cart, which this also cleared out more space for tools. I also put in a shelf on the wall for my larger items like my drill press and bandsaw so I don’t have to store it out in the shed and it will be close by for me.
Hardware storage
More hardware storage
Shelf for large items
Clamp storage
I also got a call done with Van’s builder support. They were extremely helpful and deep in their explanation on the design of the airplane and other things. Long story short, the hold I drilled accidentally is fine to be left there. I will just need to swap the hardware for the nut plate from the MS21051-L08 to the K-1008. He said I can use a spare piece of aluminum as a backer for the nut plate to go against on that side since there probably won’t be enough material in that place. I’ll have to take a look at that closer when I get a chance. The other item had to do with the holes for those nutplates being close to the edge. He stated that this is acceptable since it is just holding the nutplate in place and that they had changed the design of the part. So I am good to build on and not replace any parts! Hopefully here soon I will get a chance to get more time allocated to this when I finalize my capstone for my WGU MBA in Information Technology here soon!
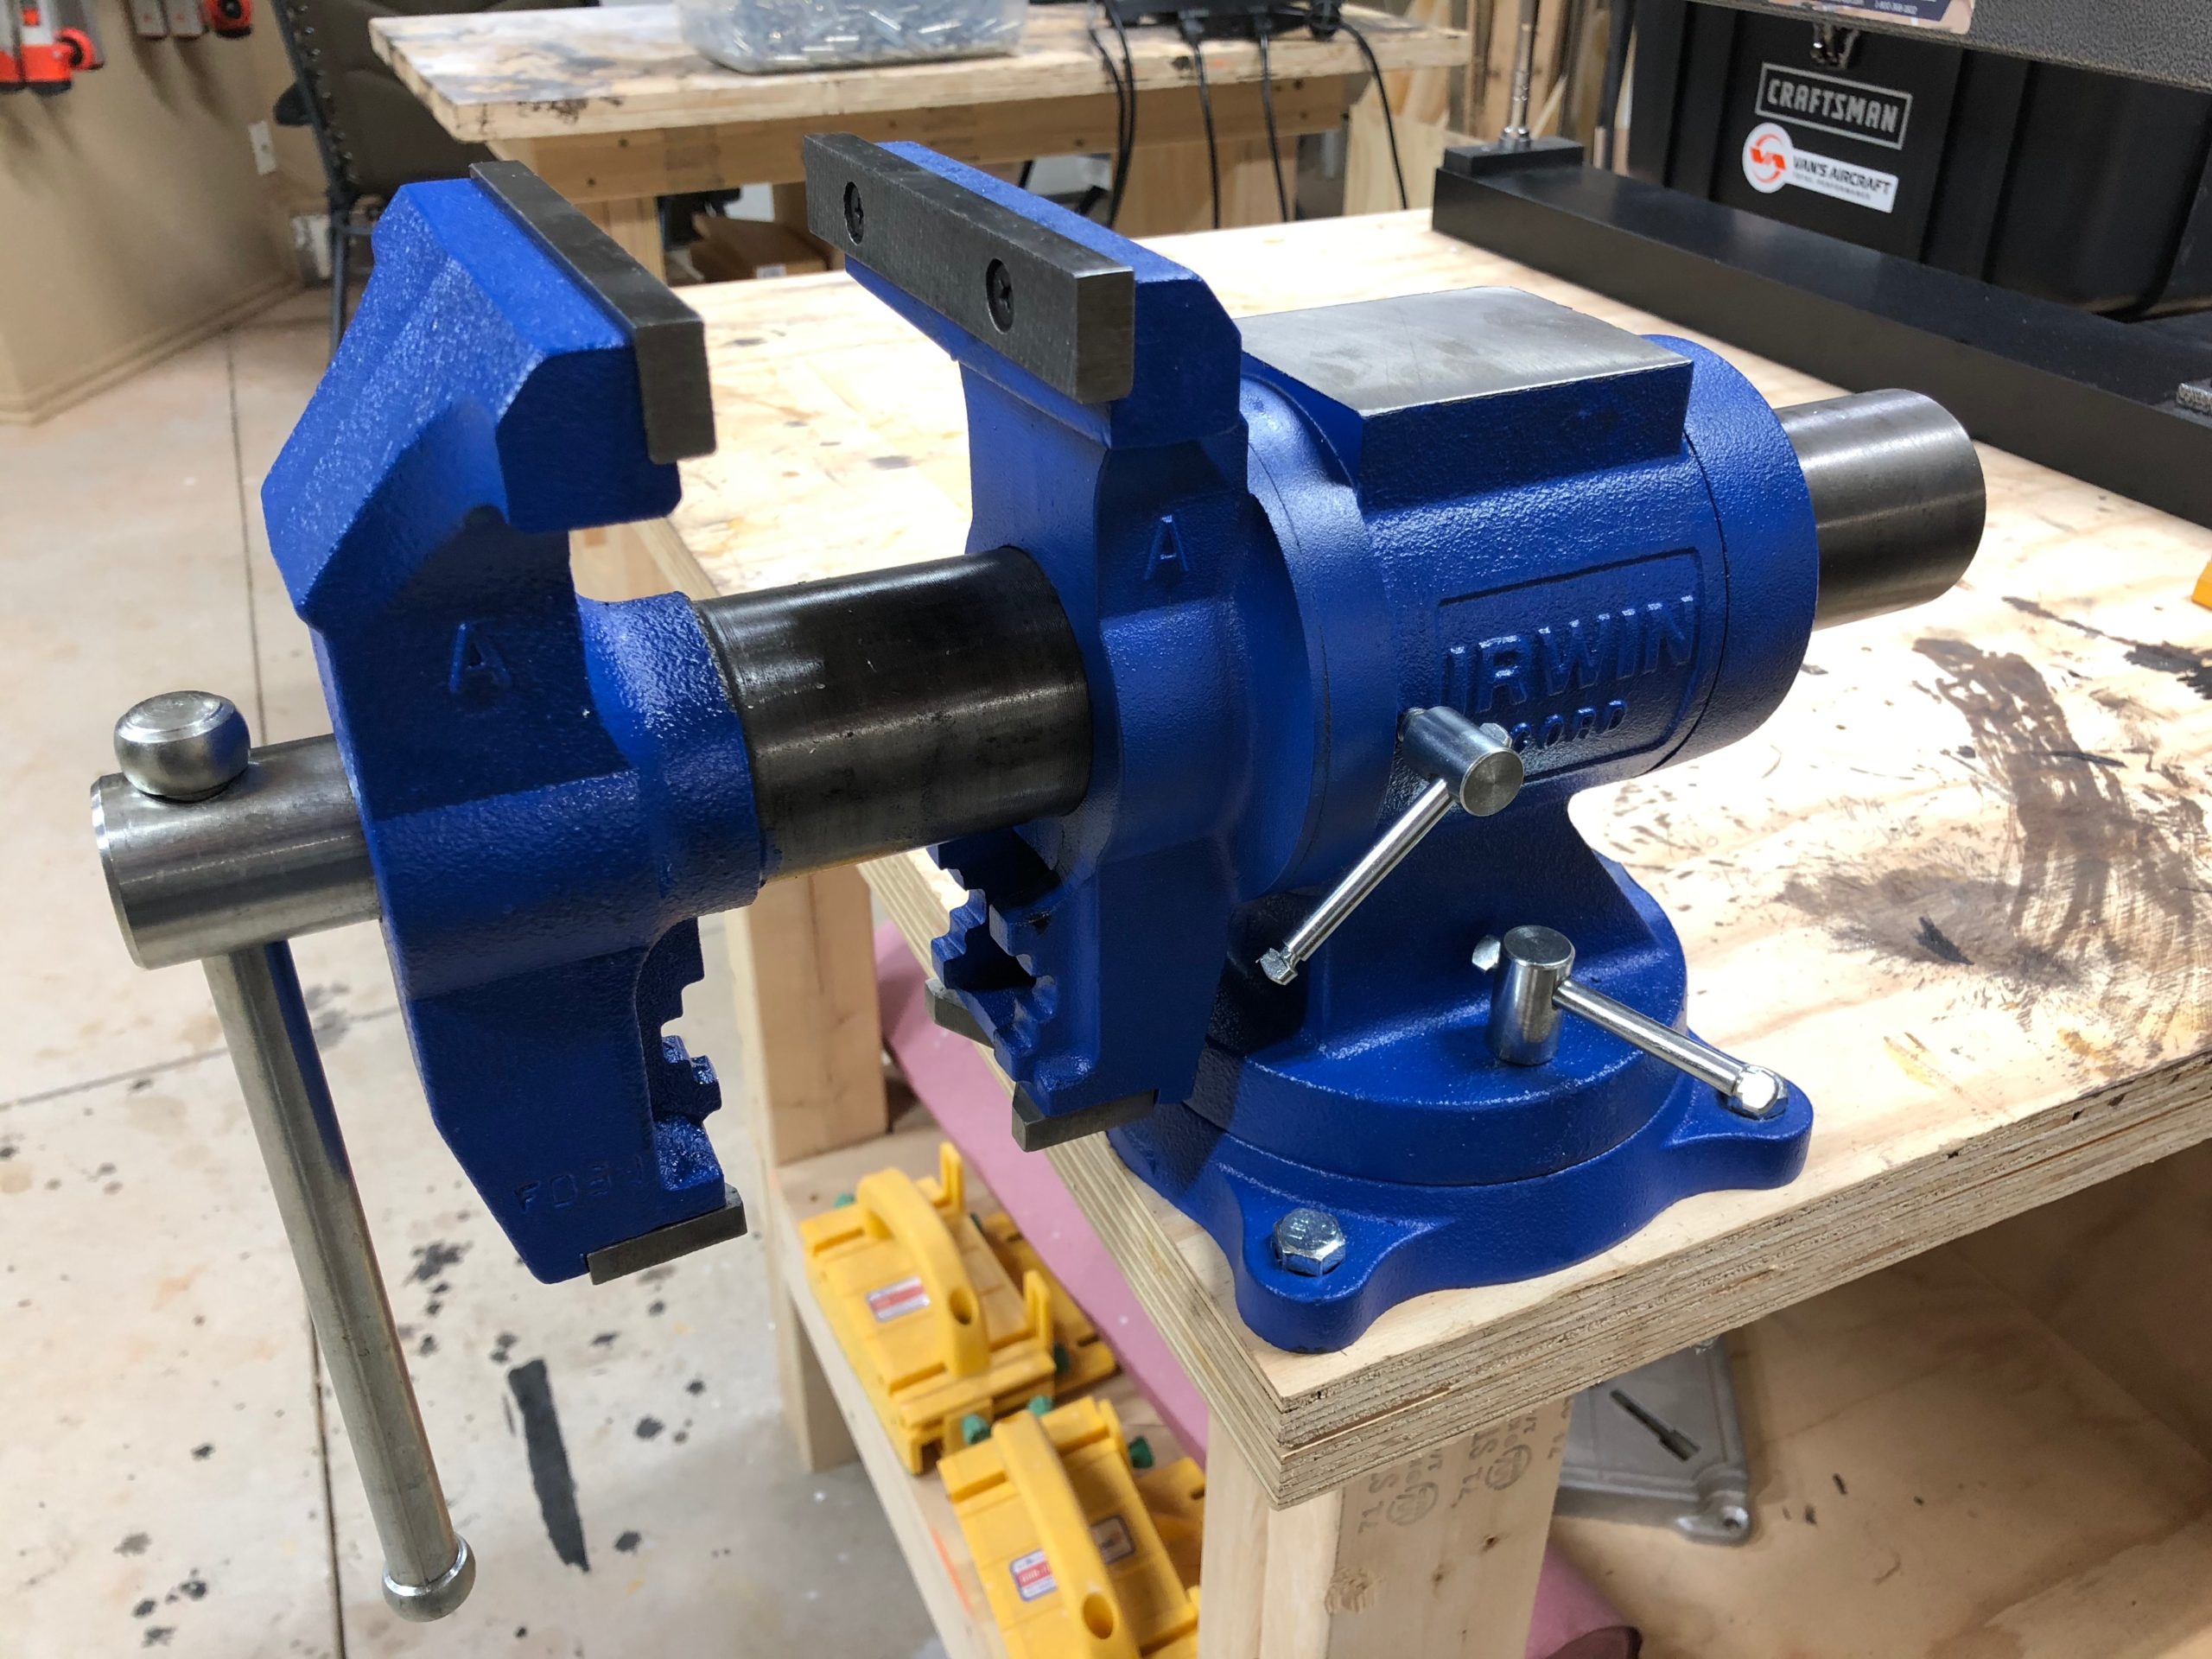
I had been limping along with a small and inexpensive Bessey 4″ vise that I got from Home Depot a while back. It was rusting pretty bad and I couldn’t seem to get it to grip anything anymore like it should. I didn’t feel like using a cheater bar because the I honestly don’t think the vise would take it.
I started my research to find a practical vise that wasn’t going to cost me an arm and a leg. I’ve started going to Lowe’s more often to get descent tools that aren’t going to break the bank. I still make the occasional trip to Home Depot, but it’s further away from home, thus making Lowe’s more convenient. But, I found some nice Irwin vises there. They had the normal small 4″ style vise, which I wasn’t interested in. There were two models that I was looking at.
The first was the Irwin 5″ Multi-purpose vise. This was intriguing because it had a rotating jaw section of the rise. It rotates 360 degrees, while the base only rotates 120 degrees. I wasn’t as concerned about the base rotating very far, but I didn’t want a fixed base either. It also had a very nice anvil section which was much larger than the laughable almost one inch square I had on my previous anvil.
The second option was the Irwin 6″ Mechanics vise. This is just like your normal vise. The vise jaws were fixed on the vertical plane, but the base could rotate up to 120 degrees as well. I liked having another inch of surface area for clamping down on material.
I eventually chose the Irwin 5″ Multi-purpose vise. Below are pictures of the vise installed. I had already used it for some of the project work today, but felt I should cover this as part of the costs I’ve spent for this build.
Vise in the horizontal positionVise in the vertical position (It can go to the other side as well)View from above
I also found some great soft grip vise pads with magnets on Amazon. They were the Trisense 6″ Vise Jaw pads. These are very well built and have a very soft rubber to cushion the part in the vise. The only problem I have is that the magnets are not as strong as they lead you to believe. Granted, this is meant for a 6″ vise, but all four of the magnets are engaged on the vise, so it should hold securely no matter what. But it quite often ends up falling off and I have to reattach it.
Trisense vise padsMagnetic side of the pads. These are not at strong as they should bePads installed
All in all, this is working very well so far and does not mar the parts that I’ve put in there. I had to repair a wooden draw pull and this was the easiest thing to hold the drawer pull together while the glue dried. It did not leave any marks on the wood and held the piece solidly together. I would recommend both of these for a good vise and hopefully I’ll be able to provide more complete feedback as the project goes on.
I wanted to first start off with a video of the final product of what the shop lights look like. They turned out great for the amount of money that was spent. I would really have preferred to have had light boxes installed in the ceiling, but that’s money I just don’t feel like I want to spend right now, and these will do just fine for the time being. I am not a fan of the cables showing but whatever. Sorry for the vertical video as I was too excited to have it completed now. LOL
Garage lights in action
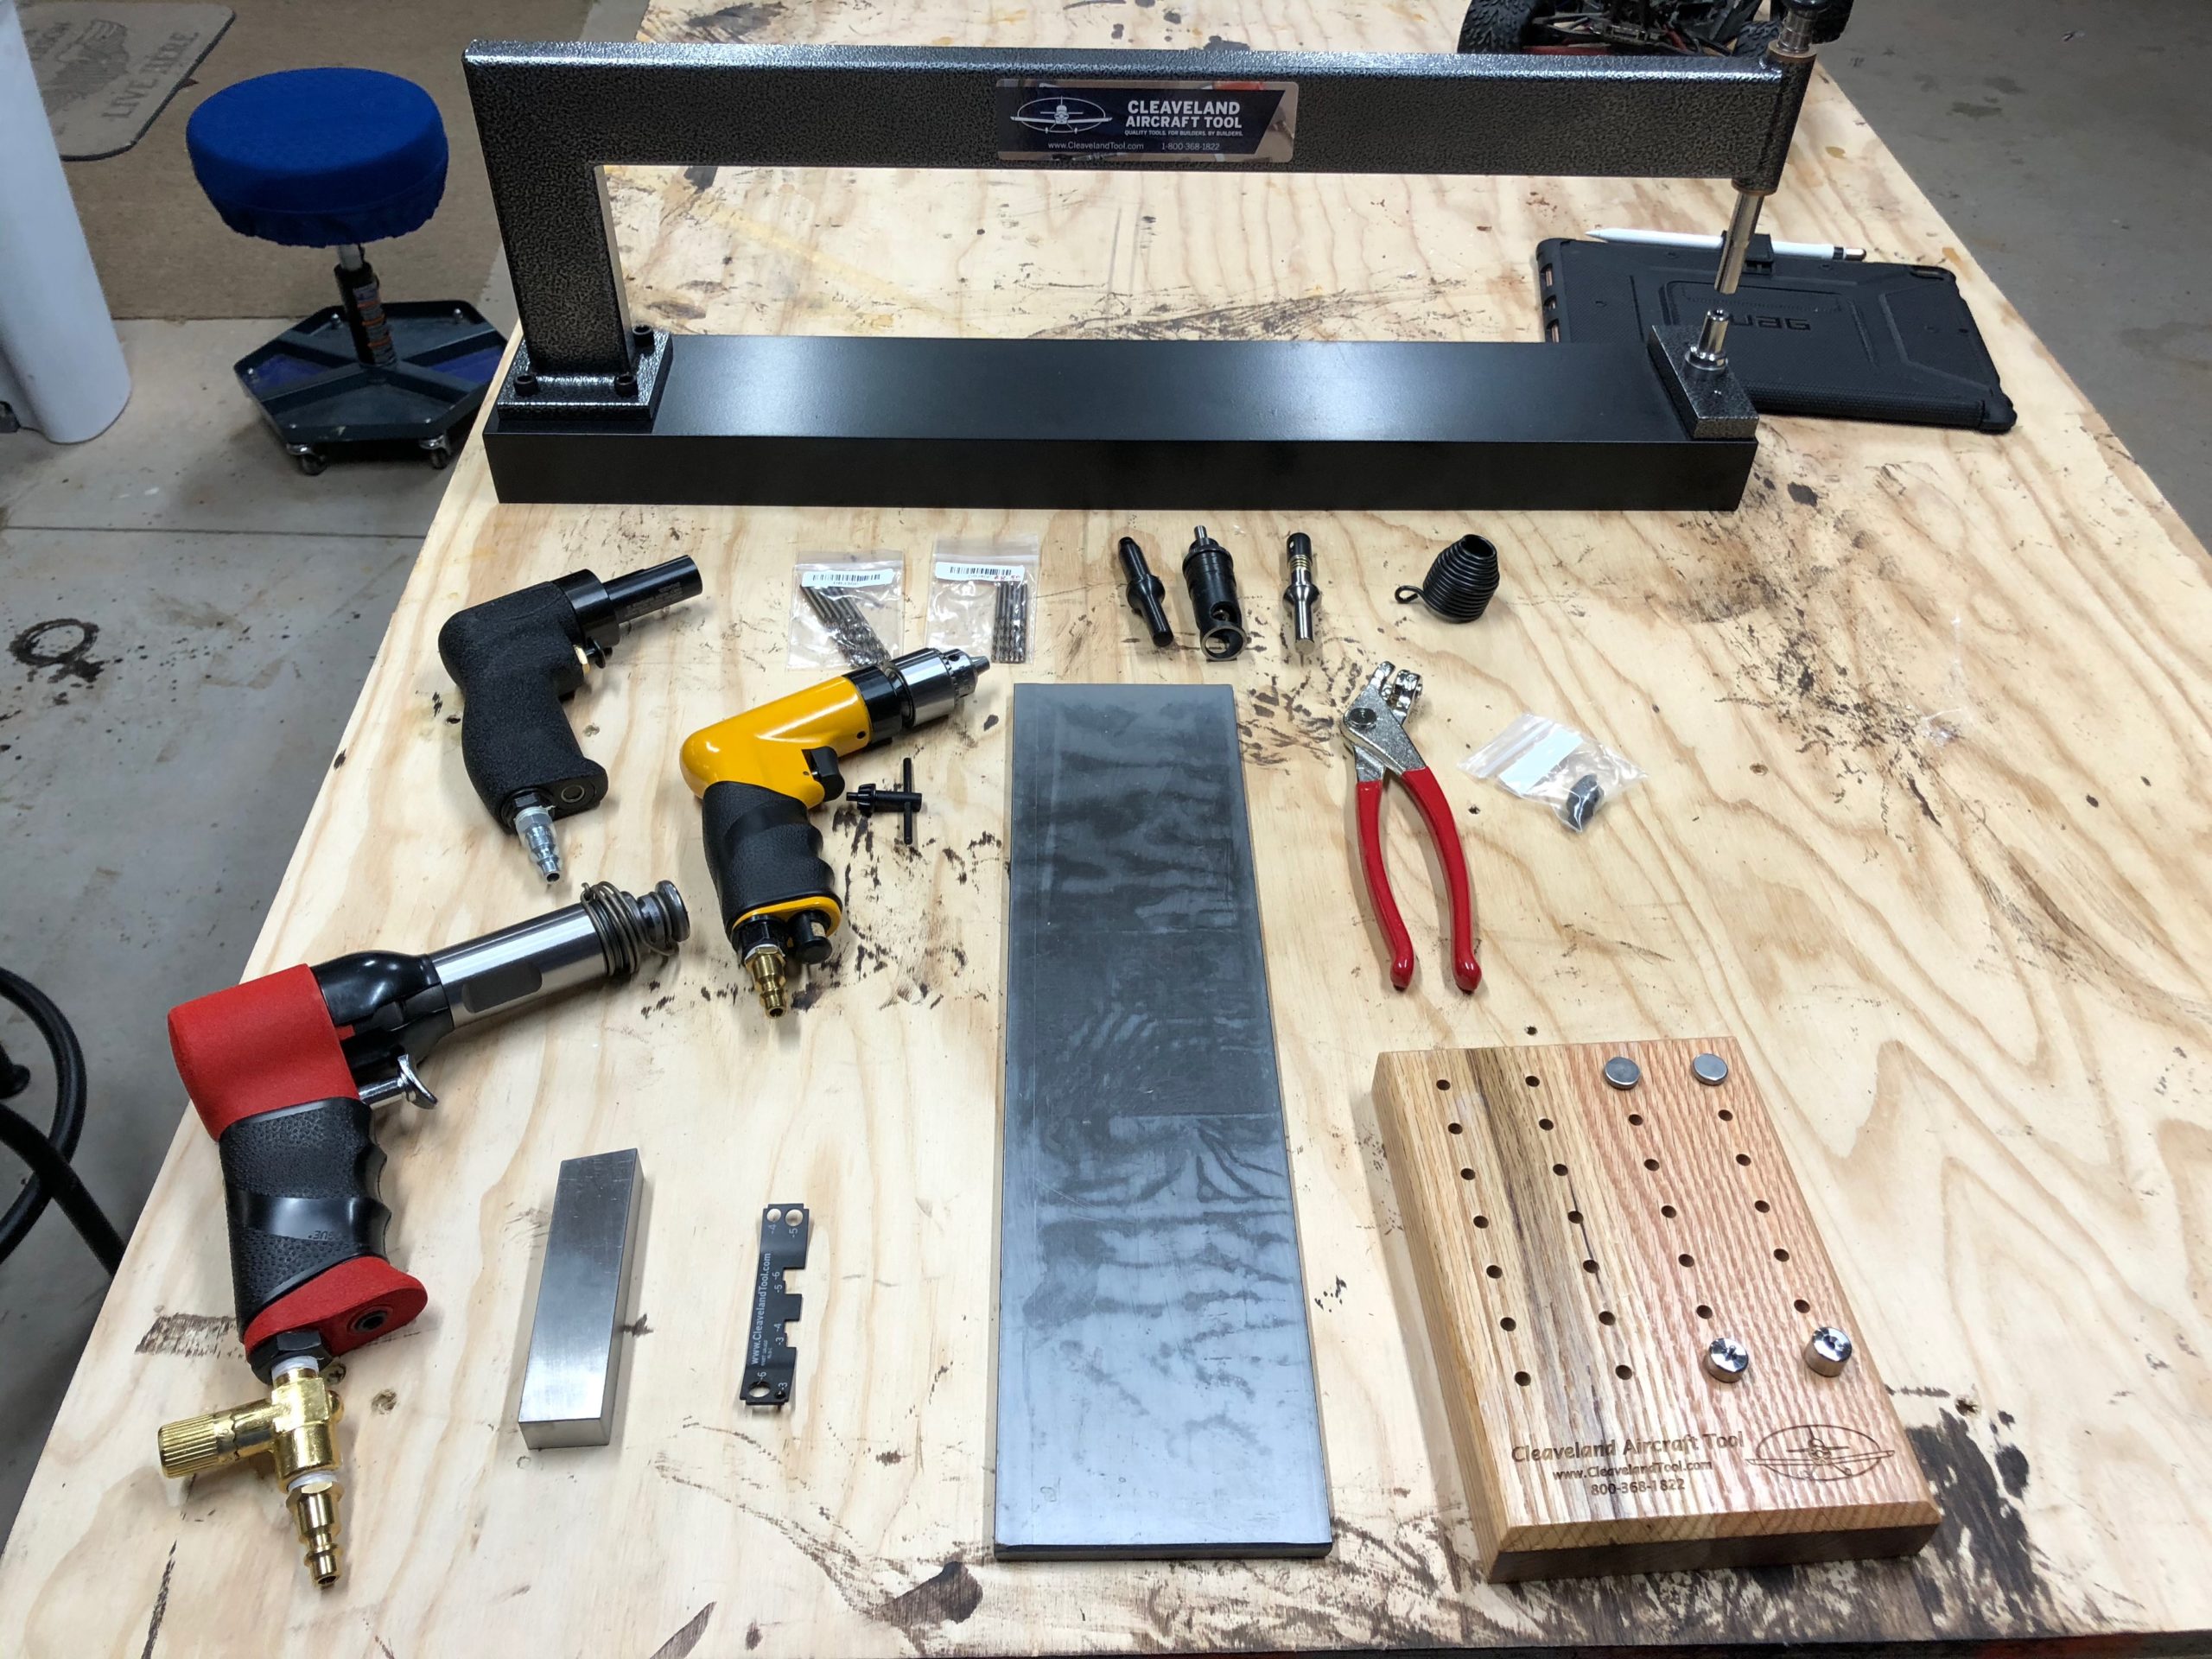
Now with the lighting sorted out and plenty of space in the garage, I was just waiting for the rest of the tools I had ordered to arrive. I got the final shipment from Cleaveland and they did an excellent job of packing the items. The tools come in a Craftsman plastic toolbox and each of them are individually wrapped to protect them in shipment. They’ve provided paper packing material in some places to fill in the voids where necessary. The toolbox was then placed in a box with foam blocks surrounding it to isolate it from the bumps from shipment. Everything was accounted for and they even mentioned that they had a few of my tools on backorder and they would ship them when they arrived. None of those tools were needed for the practice kit so I’m fine with that for now.
All of the tools assembled in one place
With everything out of the way and the air tools properly connected with the right NPT connectors, I started working on the practice kit. I didn’t bother with working on de-burring the skin on the first project of the practice kit as I wanted to focus on a few things at a time and of course I was excited to use my tools for the first time! The first project only had three steps mentioned which was not a ton to go by for a noob.
I sat down and really dug in deep to the rest of the material they provided me which was basically all of section 5 and what appeared to be all of section 3 as well. Section 5 covers building basics such as sanding the edges, de-burring both edges and holes, riveting basics, nomenclature, painting, electronics, the whole lot. I will say, this project does not appear that it will give you exact step by step instructions and they expect you to know how to select the right size rivet, drill the right size hole, how to dimple, the lot. But the instructions they do provide, you need to read them word for word and make sure you understand what they are conveying to you before you proceed. Reading schematic/engineering charts is also an art that will take a little bit of practice but is not too difficult.
After reading up on those sections (which I will probably have to read them three to four more times before I fully understand it all) I felt confident going back to the project and starting it anew. None of the holes for the first line of rivets was drilled on either piece. I took the measurements they provided and marked them on the top skin with a blue fine Sharpie. I used some spring clips to hold the two pieces together and used my drill press to drill the holes. I learned very quickly on the first hole that you need to have a clamp supporting the piece to the drill as well. This is not like wood and will bite you once it penetrates the metal and try to start spinning your work piece on you. After clamping the piece down, I would drill another hole. Release the clamp, move the piece, clamp it down, and drill another hole. Rinse and repeat for each hole along the entire edge. I eventually started using clecos to help hold the two pieces exactly in alignment. Now, this was the only de-burring I did for this first project. I took the de-burring tool and used it very lightly on the back of the holes I had drilled just so that I could rub my finger across it without feeling it snag.
I will tell you that using the C frame dimpler is actually not that bad. It is quite loud with each hammer swing, but I feel like I quickly got used to the sound the dimpler would make when the hole was fully dimpled. I would have to swing the hammer twice to get it to fully seat which is fine by me.
Now, it was time for my first rivets… I had set the gun to what I thought was an appropriate level with only 90 psi of air pressure at the tool. I then reduced it even further with the inline air restricter. I selected what I thought was the right rivet and started going at it with the 16″ steel plate as my bucking bar. My rivets were flatter than a pancake, which I knew couldn’t be right, but I kept going trying to work out the problem as I went along. Long story short, each of those rivets was bad and I had to redo the entire line of rivets, but I don’t count this as a failure. This is an opportunity to learn how things feel, and more importantly I get to learn how to remove rivets on a practice piece rather than the real thing.
Really.. flat.. rivets..
With my second go around, I finally read AND understood the instructions on how to select the proper rivet and I also got very acquainted with the Cleaveland Tools rivet gauge. This is a very handy tool to get started and sight your eye in to what a proper shop head on a rivet looks like. With that I was able to get these rivets worked out… Not too bad, but definitely not perfect either. Still need the practice, which luckily I will get on the second project of the practice kit, which I plan to start tomorrow.
Second set of rivets with the right size rivet to begin with
All in all, I am glad that I’m learning this the hard way now. I’m one of those kind of learners that has to just start and get his hands dirty, learn from my mistakes, and chug along. Here’s to tomorrow’s practice day!
My second shipment of lights has finally arrived. I’m not sure why they are shipping all three lights in different boxes, but oh well. It was easy to add this second set of lights and oh man it has gotten nice and bright in the garage! I will definitely not have issues with seeing what I’m doing out here while building. LOL
Second set of lights up and running
I also got my first two orders or tools from Cleaveland Tools in. I should have just ordered them all at once, but I had originally thought “I’ll just order some of the tools necessary to do riveting and the learning kit to see if I would like putting this thing together.” Upon receiving the training kit and just reading and imagining putting this thing together, it got me super excited and I just knew I would want to do this! I love putting things together and especially when it has to deal with aviation, I’m all in! I have always loved working with model planes and putting those together, fixing them, tweaking them, etc. Granted this is alot bigger, more expensive, and definitely requires precision and attention to detail, but I think I’m up for the challenge!
All of the tools in my first shipmentJust the tip of the iceberg for my Clecos. LOL
The final shipment of lights and tools are supposed to arrive tomorrow or possibly Friday. I’m excited and I’m almost done reading the book over a few times for the training kit. Once I feel comfortable and have all of the tools setup, I’ll start working on the kit. It doesn’t go into much detail, but I think there is enough there to get the job done with some additional research from other websites and books.
When it comes to tools, you could often call me a tool nerd. I spend a lot of my time perusing the local Harbor Freight, Lowe’s, and Home Depot looking at the different tools. I also spend time looking at more quality tool outlets online such as Festool and Woodpecker (yes I do more woodworking than machining right now.).
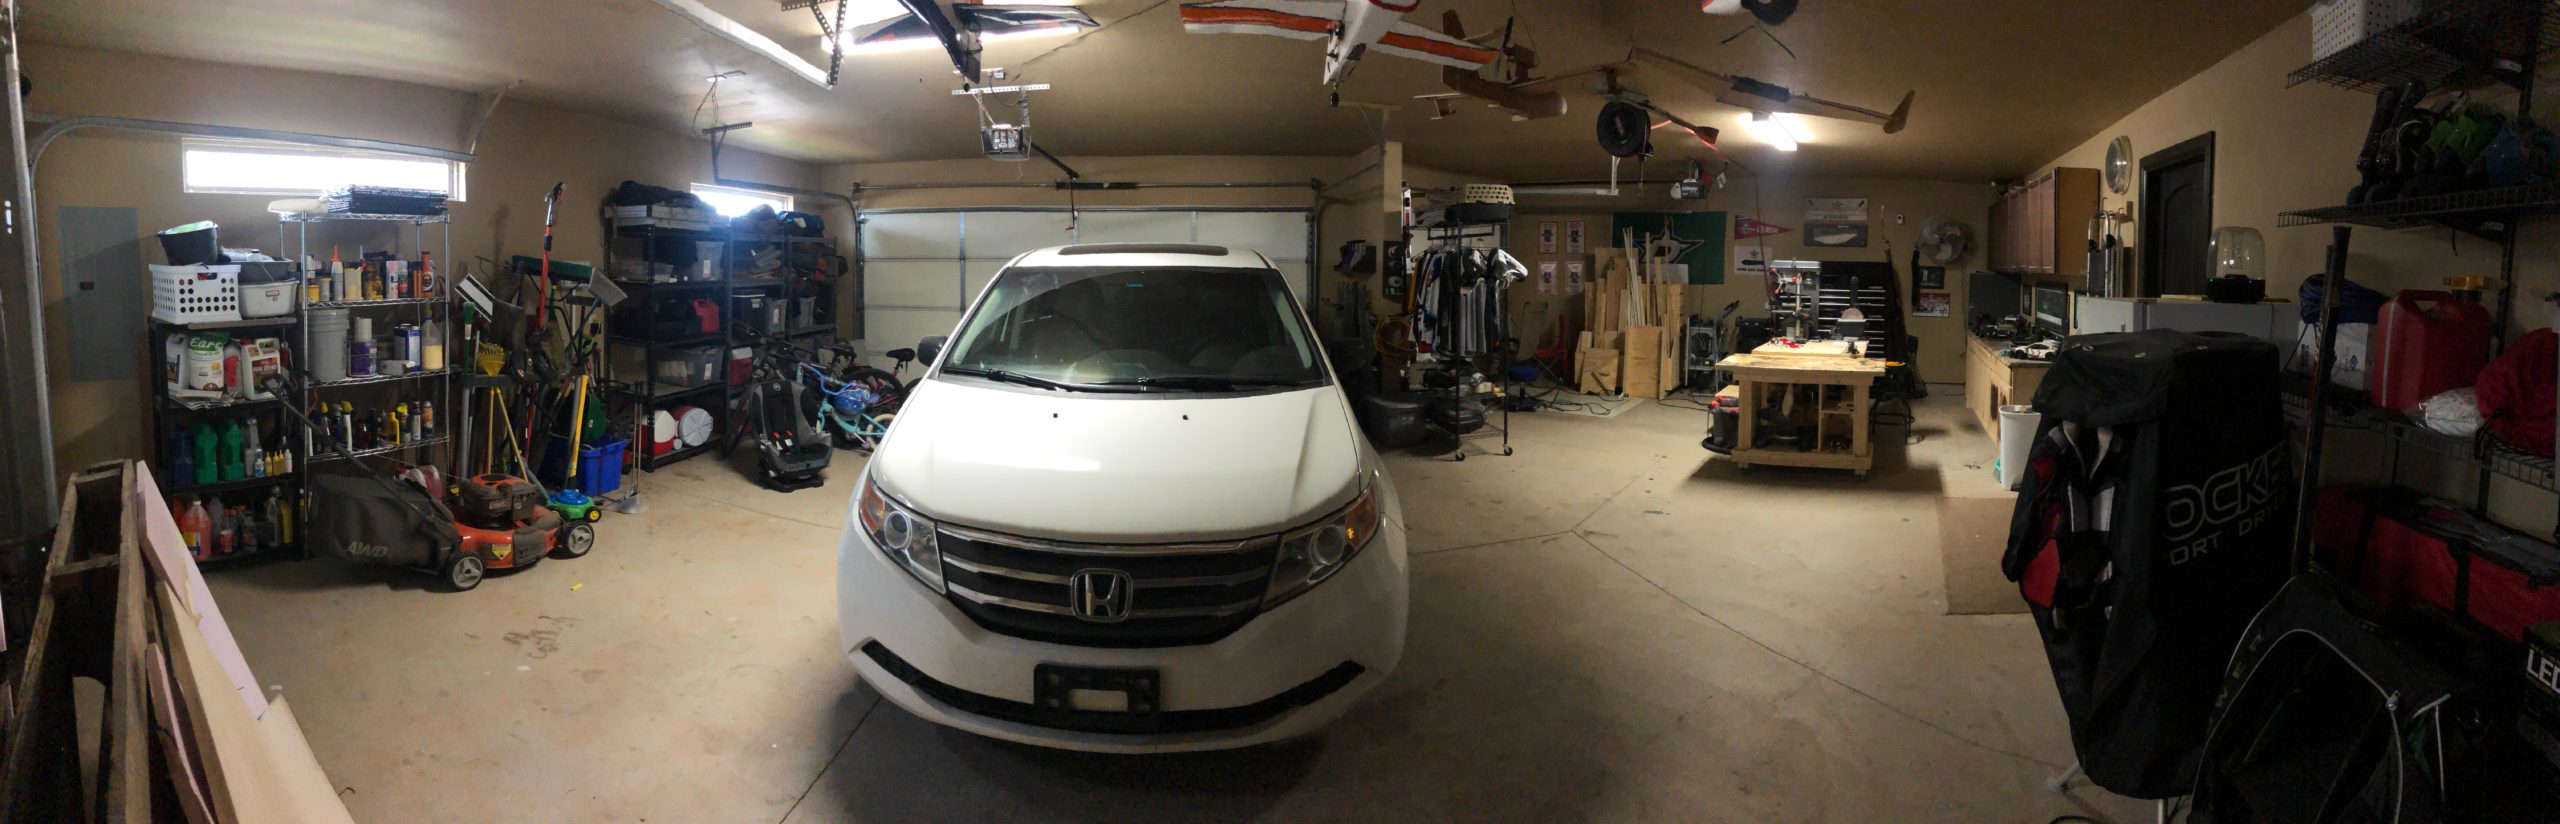
I also have a really nice workspace already setup. Like I mentioned earlier, I do quite a bit of wood working and I’ve got a 4′ x 8′ table (two sheets of plywood glued together so it’s super sturdy) as well as a rolling 2’x4′ table that I use for my miter saw, and for assembly. And this is all in a 3-car garage that is slightly bigger than a standard 3-car garage. It has the two car slots at a slight angle to the single car slot, so I have two extra little triangles of space. It’s just shy of 1000 sq. ft. so I’m very happy about the space I have to build this in. My wife will be able to keep her parking spot while I get the space I need to build! (or at least I hope I get the space I need! Happy wife, happy life!)
I started at the normal place for information, Van’s website. They have a full list of tools that they recommend for the build, which also includes some specialty tools for certain models, of which the RV-10 is a member of.
They also had a list of companies that you could work with to get these tools. The one shown the most, and one that I’ve seen the Plane Lady mention quite a bit in her videos, is Cleaveland Tools. They had a well maintained website and a set of curated videos going over the tools that you would need to choose between. They have the majority of the tools that you will need for this build in my opinion, all except for a pneumatic Cleco tool, which I feel I will need down the road. But I think I might just get a few extra of the Cleco pliers and have the kids help me out with installing these things. A family that builds together, stays together! LOL
I put the items that they recommend for the RV-10 build in my shopping cart and made a few additions. One was the 2.5″ flange-nose pneumatic yoke for some of the tight areas that the Plane Lady mentioned in her videos. I also chose to use just the C-frame dimpler rather than the compression dimpler. I’ve watched a few reviews of these tools and it seems like people are torn between the two and no appreciable difference can be shown as to why I should spend so much on the compression dimpler. That’s why I decided to get the C-frame. Plus it will give my kids some time building their muscles swinging a hammer doing the dimpling with me 🙂
In total, with shipping and taxes, those tools are going to cost me $3250 to get, which is almost as much as the empennage kit. But, I am always of the mindset that you get what you pay for. If you cheap out on a tool, it’s more than likely going to do a cheap job, which I prefer to not do if I can help it. I’m still going to hold off on the tool purchase for now until I can talk with the local EAA chapter about what they would recommend tool wise, but at least this would give me a good ball park of what to expect.
Finally, I know I will need to upgrade the lighting in my garage. I upgraded it some when I first moved in, as they thought two 60-watt bulbs for a nearly 1000 sq. ft. garage would be sufficient…. I bought two florescent fixture kits that provide 5000 lumen each. But little did I know how little 5000 lumen is for such a large area. I struggle at night to work out in the garage on my wood working projects, at least if I’m not close to the fixtures. With that problem in mind, I’ve planned a few things. I plan to do the following to the garage:
Under-cabinet lighting
I have four wall-mounted cabinets that have some very cheap stick on push activated lights. I want to get rid of these temporary solutions for this: